Kev rang me up a month ago and let me know that he had installed his new doorbell button and run the wire back to the installation above his hearth. He was ready to wire up the last bit and test.
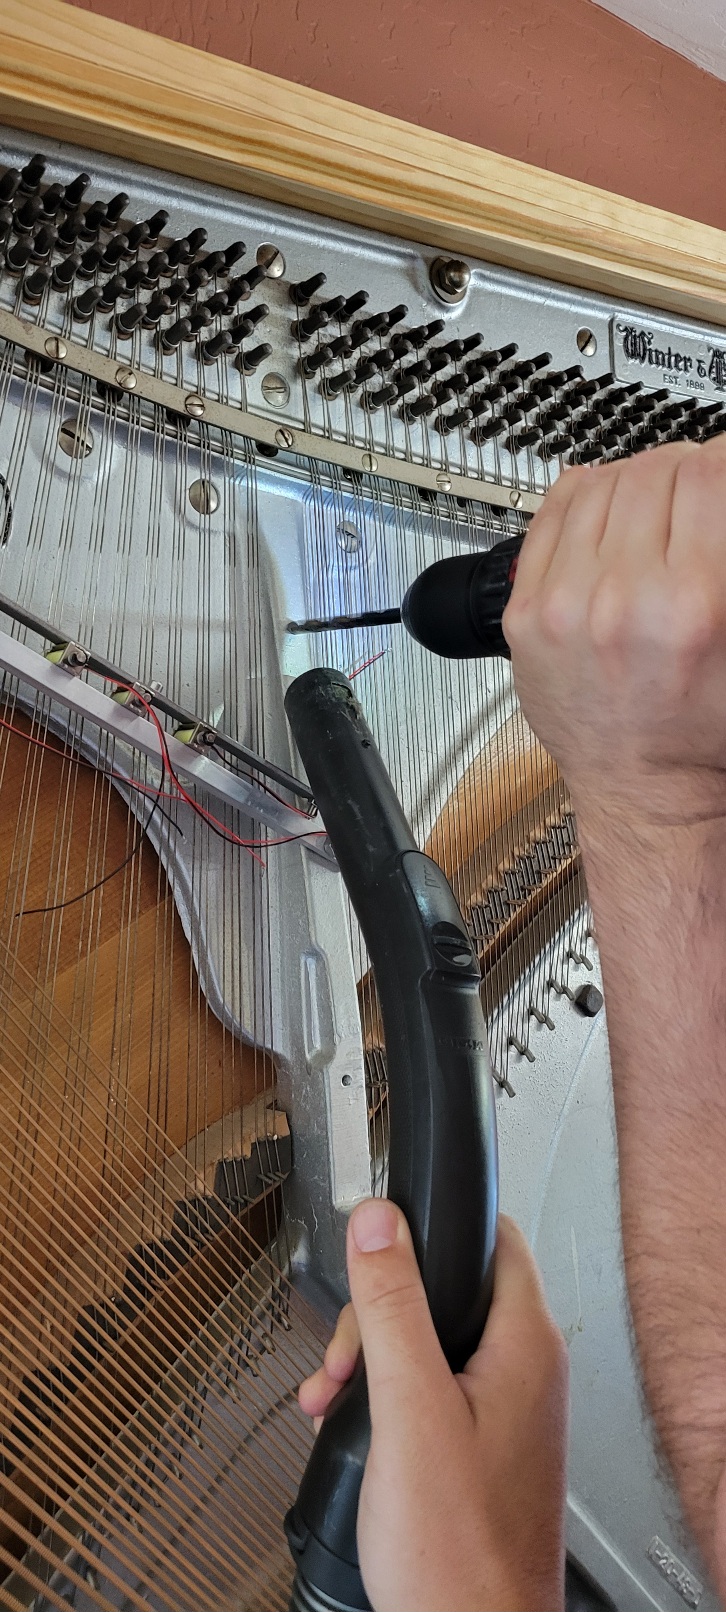
With some effort we were able to pull the piano frame away from the wall. Kev drilled a hole through the aluminum harp through the spruce soundboard and we fed all of the wires for each of the solenoids through.
The first tests fired the wrong solenoids, which didn’t happen in our earlier tests. We opened up the project box and found that some of the wires were grounding out on the metal lid. Using electrical tape, we insulated the wires and that got things working as they should.
No need to modify the solenoid strike timing, the tempo of the chime or anything else. It sounded really good. Check out the video below!
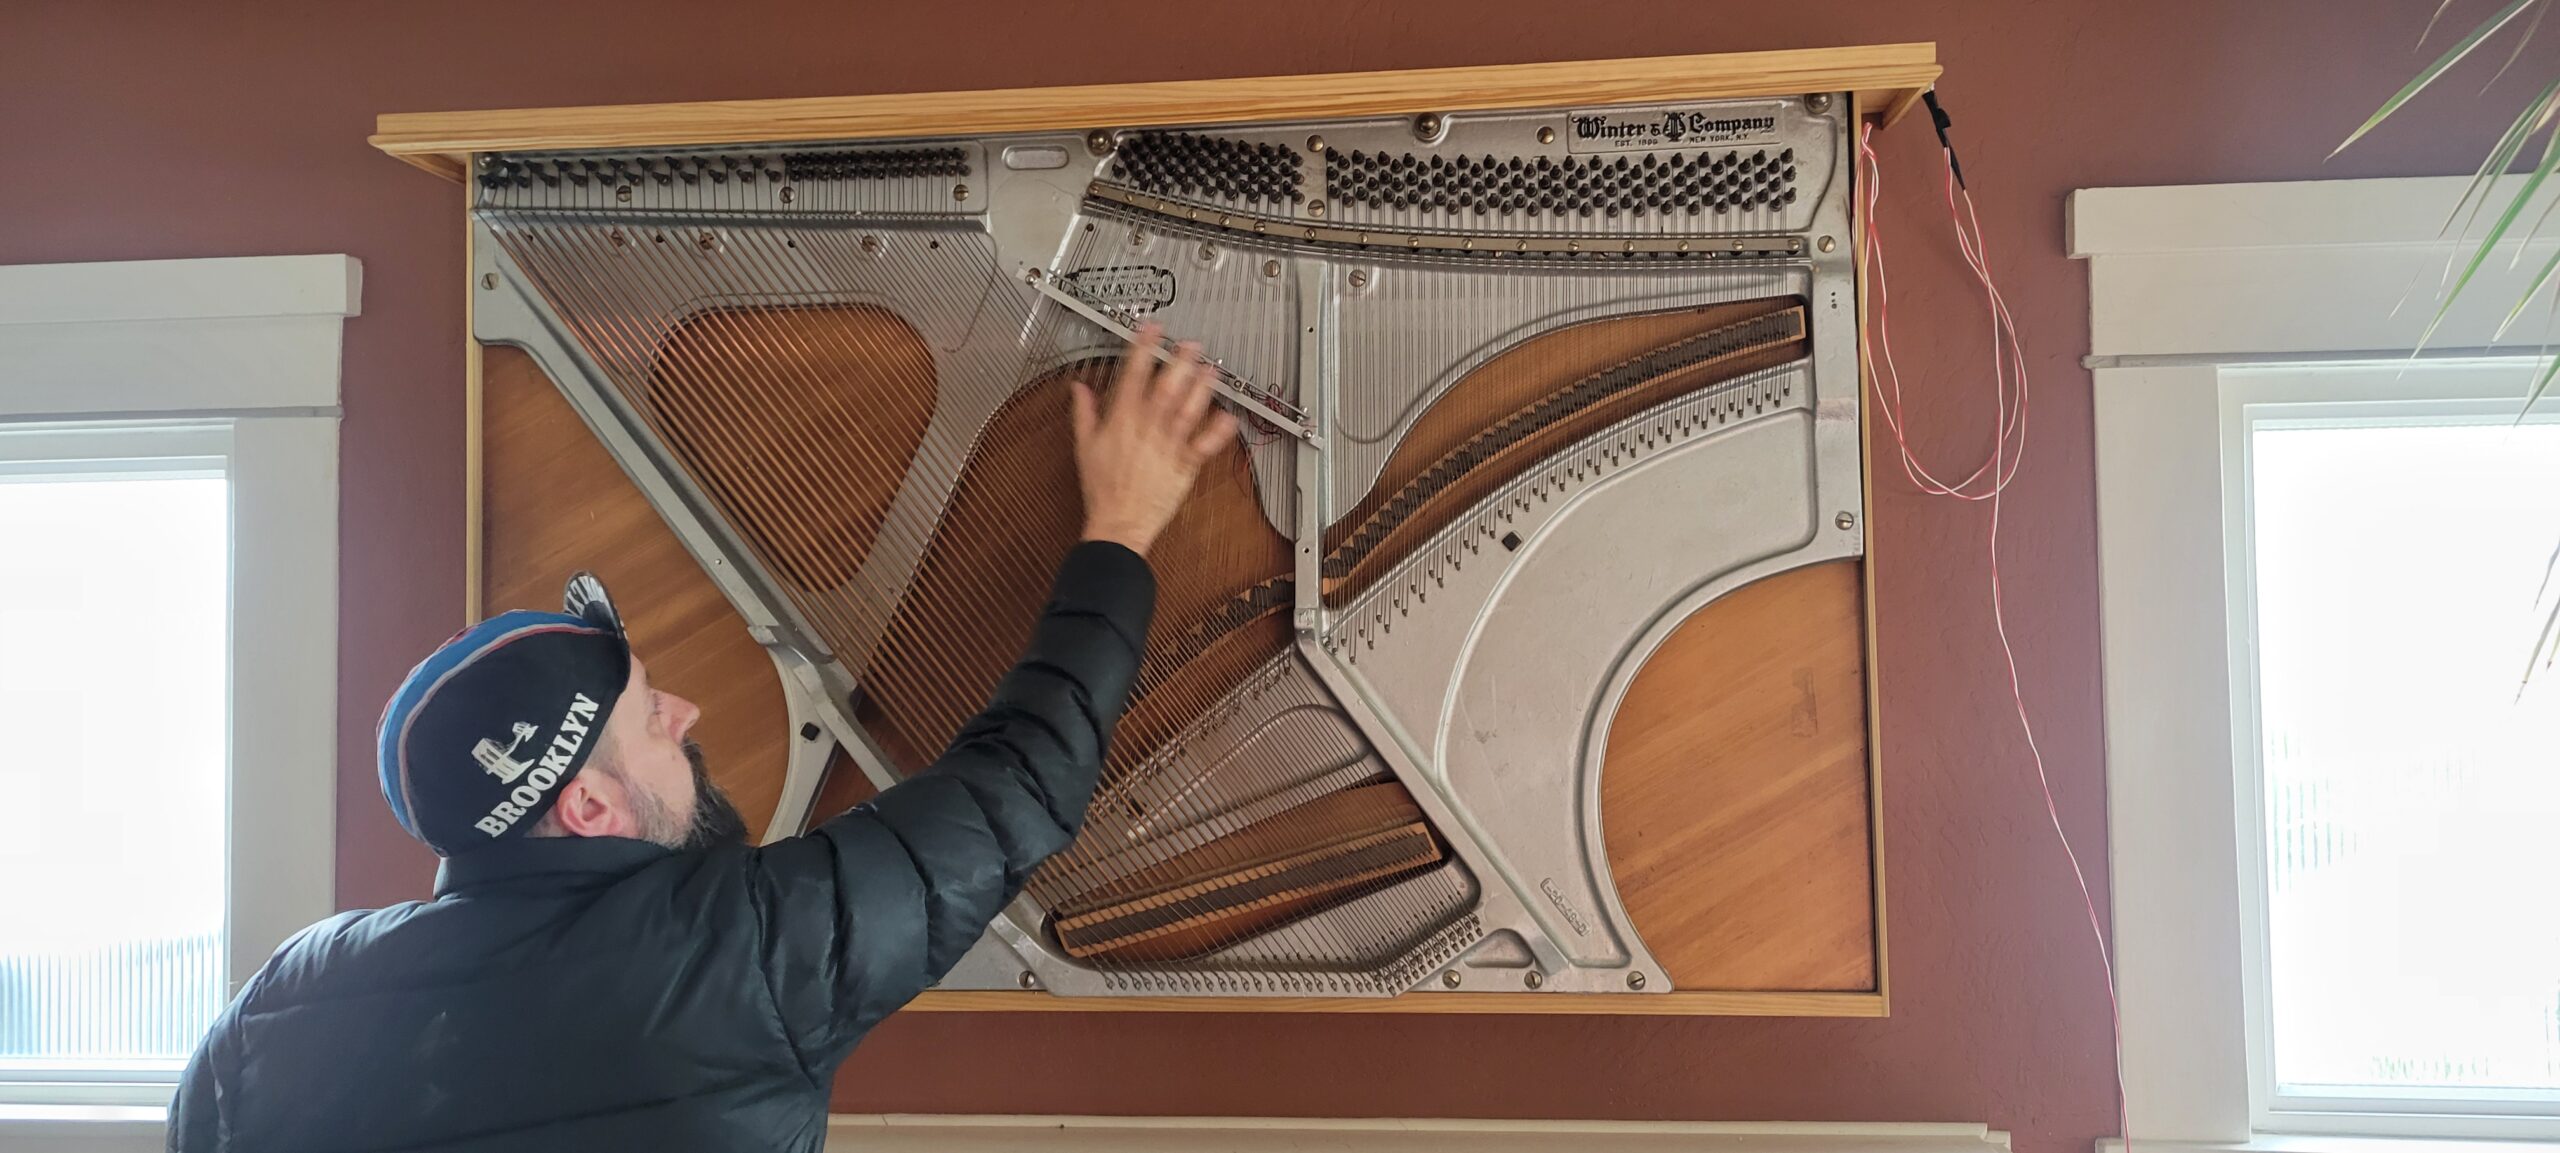
Kev did some minor clean ups to the wiring by covering them with some aluminum U-channel and concealed the doorbell wire by cutting a small groove in the wall that follows the baseboard, running the wire in the recess, and filling over it with plaster. He already had done a section and it looked perfect.
Finally he wrote to me the next day saying that in the evening the doorbell was illuminated by the 5V supply, which was a pleasant bonus surprise. All in all it was a lot of fun to collaborate on and is an awesome feature of the home that turned out exactly as we hoped.
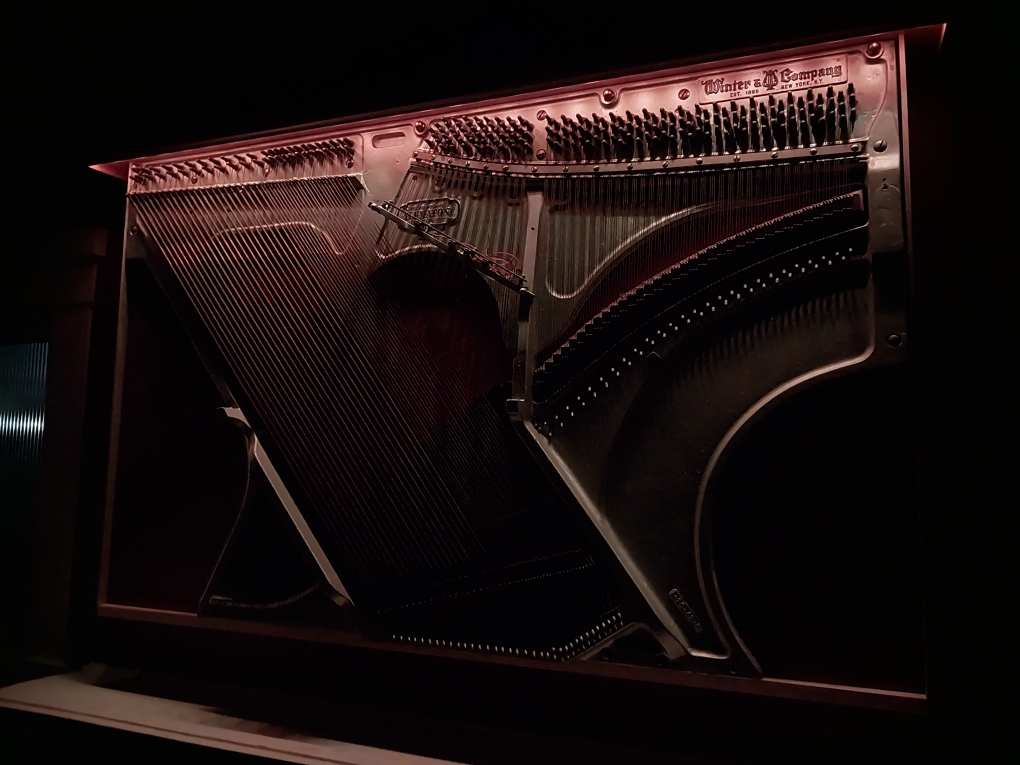
At a local bar I met up randomly with an old roommate who told me about a project that he was working on. He came into possession of an older spinet piano with an aluminum harp frame. It was really light weight and he had the idea of hanging it on the wall as an art piece with some back lighting and was looking to make it functional as a doorbell.
This got me excited and we headed over on our bikes to check it out. It was totally beautiful and really well mounted and framed.
Photo by Kev.
Kev had gone one step further and mounted a rail with solenoids aligned to 4 strings he had tuned to the four notes of the Westminster Chimes (think grandfather clock chimes).
We had a great afternoon catching up and being blown away by how cool this project was, I offered to help out. I had an Arduino Uno that I’d gotten as a birthday gift many years ago and never had a worthy project to use it on. This seemed perfect.
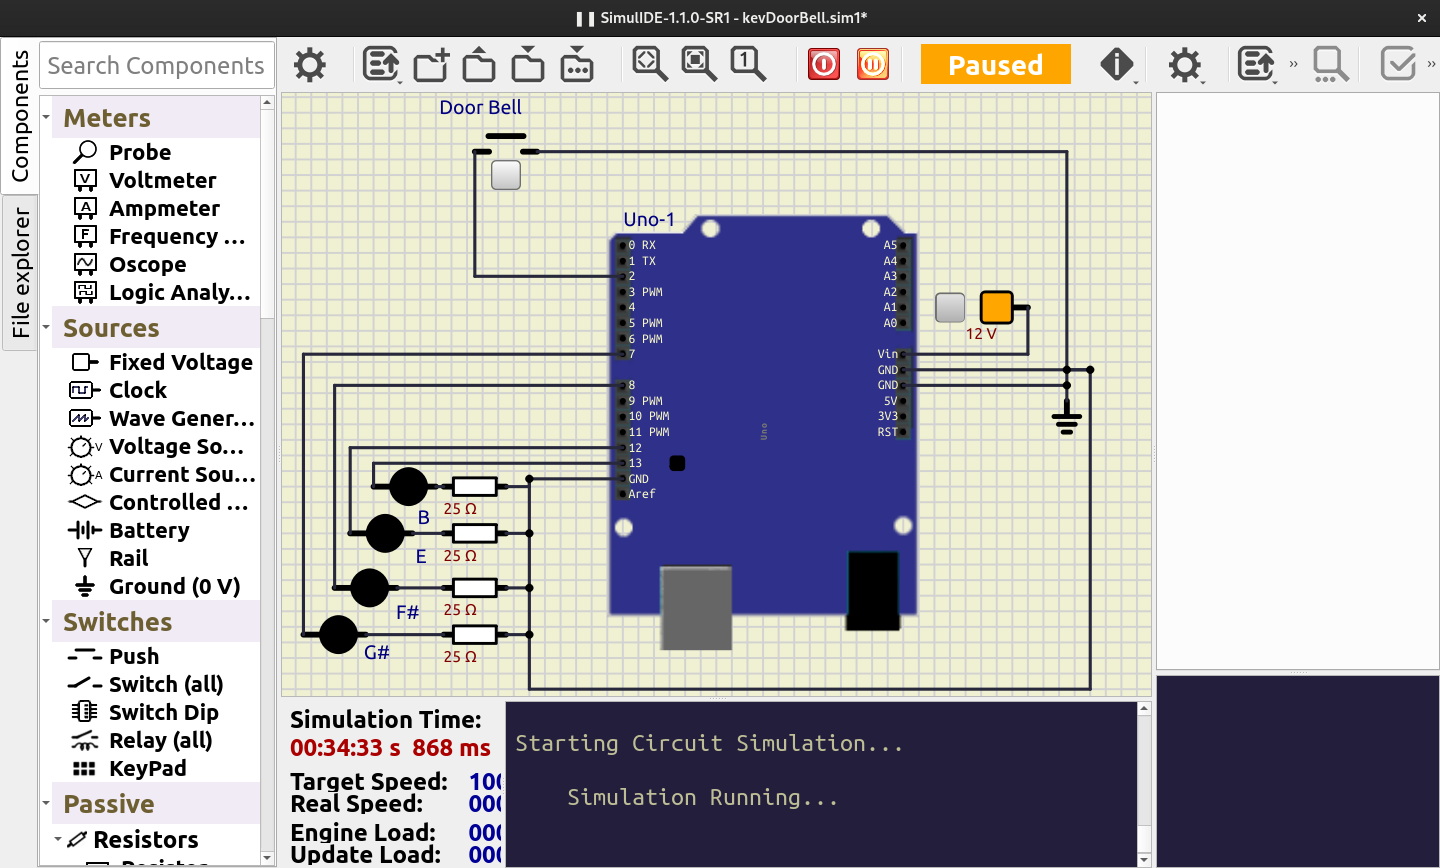
I downloaded the Arduino IDE for Linux as well as SimuIDE to test out code. It was pretty straightforward to make up a project in the IDE, code up the basics for the doorbell, and test in the simulator. You can find the code for this project at KevDoorBell on github.
In the simulator I used some simple LEDs to represent each note, G#/F#/E/B. They would flicker on and off with the 10ms note trigger duration. For the actual physical doorbell, this trigger would be actuating a solenoid. To do that, I’d need to look at methods of using the 5v signal off of the Arduino’s output pins to drive the 12v solenoids we had.
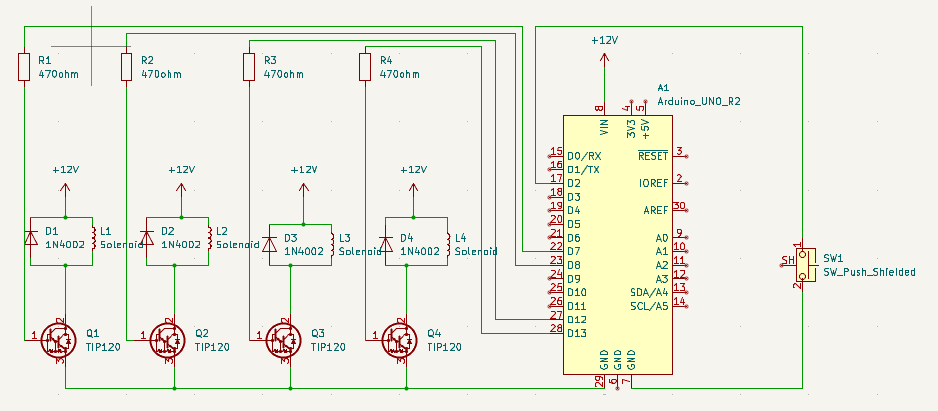
To control the solenoid’s it was easiest to follow the recommendations by MakerGuides to use a Darlington pair transistor to control the flow of 12v. Each solenoid would need a TIP120 transistor, a 1N4002flyback diode (to eliminate inductive voltage spikes from the coil in the solenoid), and 470Ω resistor to adjust the base voltage in a range that limits the max amperage draw from the Arduino and amperage through the transistor. The components were about $25 through Mouser including a small project box and protoboard for soldering everything together.
I drew everything out in Kicad while we were waiting on parts and it seemed pretty straightforward
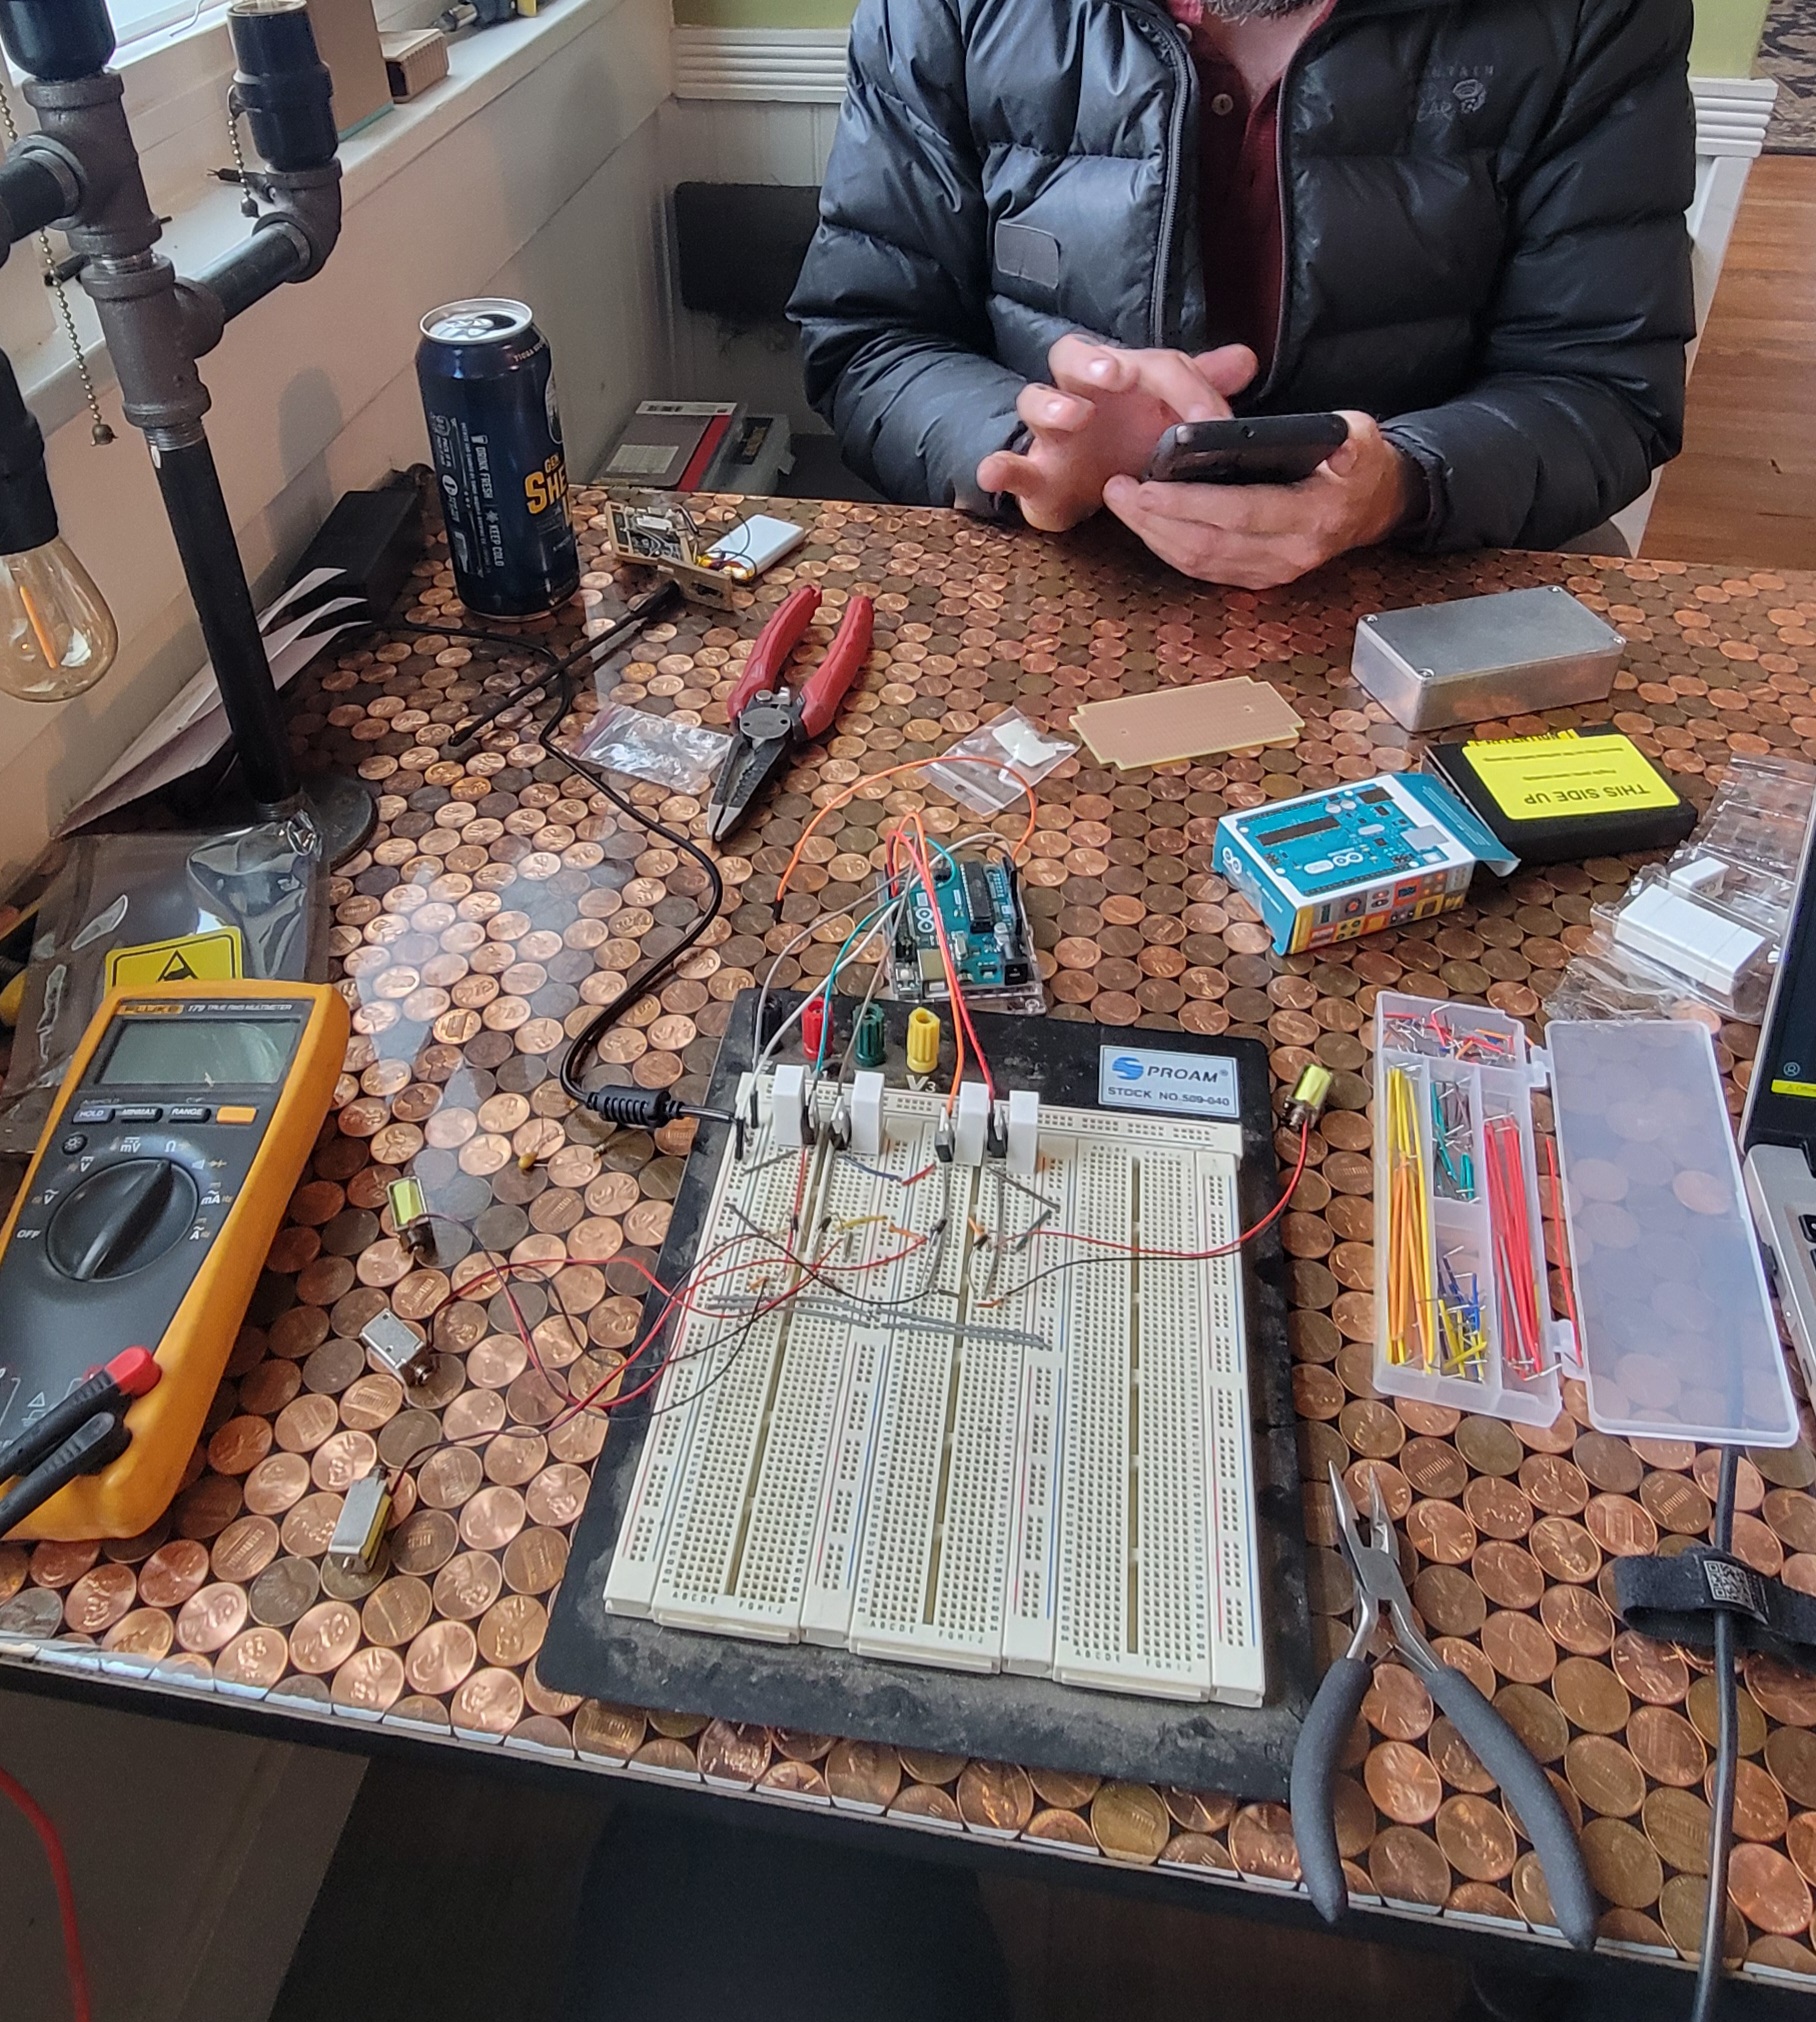
With the ordered parts in hand, we were able to breadboard up the circuit and test with an old 12v power supply. Everything tested fine via multimeter when triggering the doorbell, but I had to head home. Kev soldered up longer wires to the mounted solenoids and was able to get our breadboard setup playing the chimes for the first time.
For the doorbell switch, initially I was using the +5v pin to raise the pin, but with some physical testing we found noise was creating false triggers. I was able to move to using the Arduino internal pullup resistors and swapping the trigger logic to eliminate the problem.
Coming back over on another evening we ate delicious homemade burgers, pulled the breadboard components, made a layout for the protoboard and soldered everything up. I had a tight time window, but we got everything together. This was my first time working on protoboard and it took some real forethought to get the layout right to have a tight footprint and be easy to solder.
The next steps are to wiring up the doorbell part to his door and doing some final testing should be all that’s left to do. Looking forward to wrapping up such a cool project and posting the final results here.
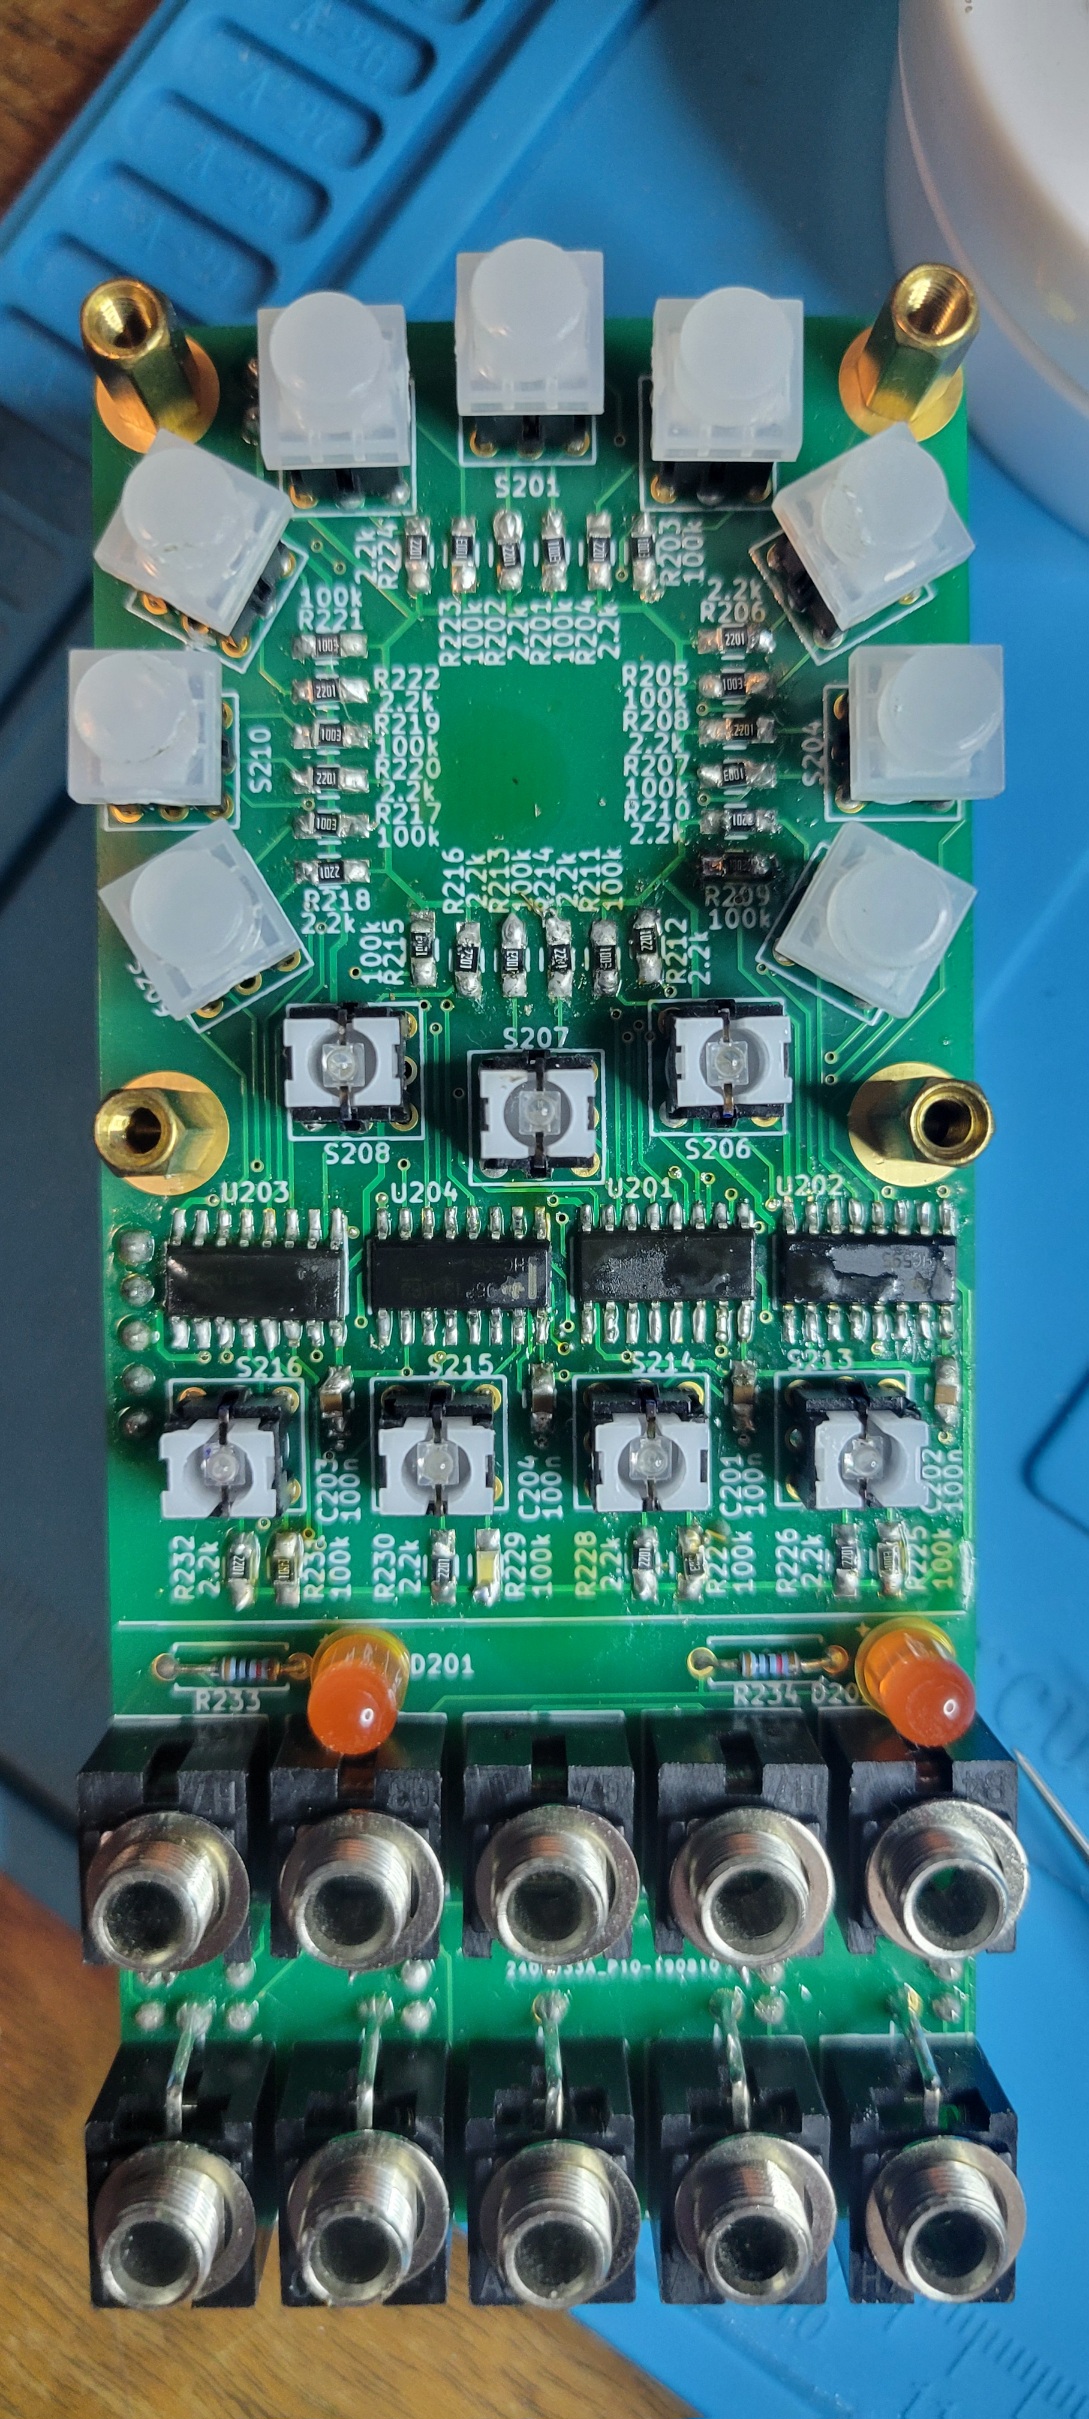
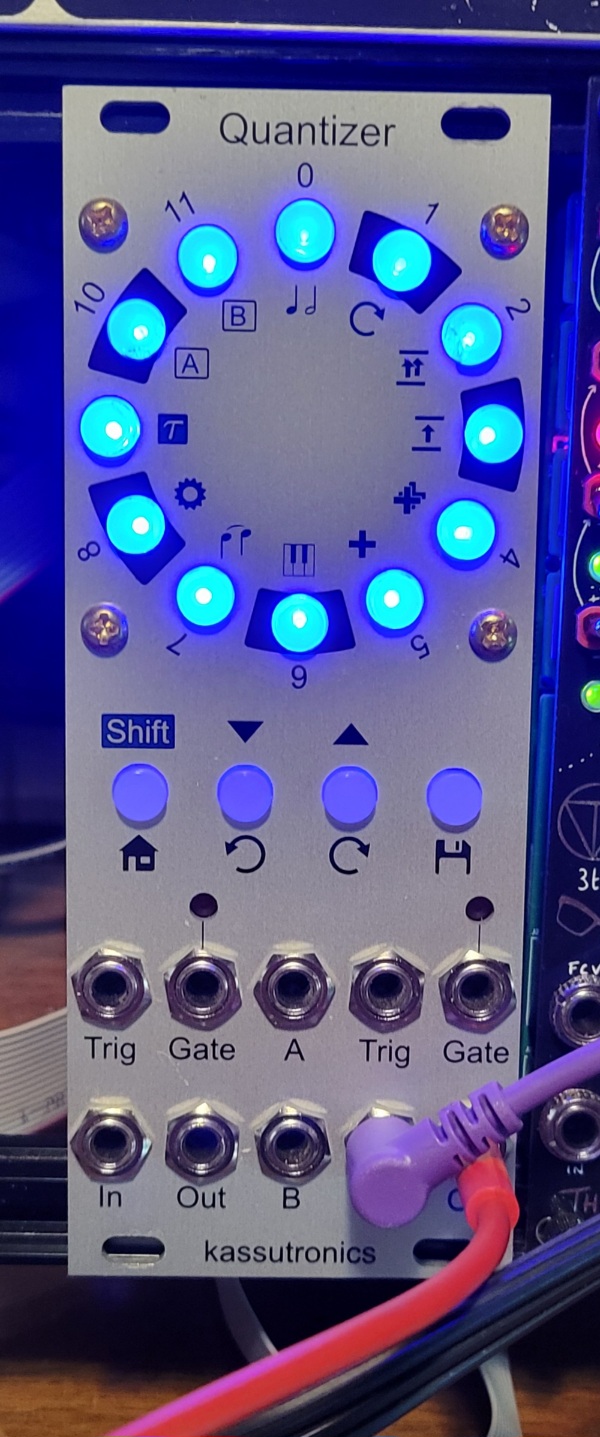
The Kassutronics Pitch Quantizer was the first true SDIY project I undertook. I’ve soldered lots of kits going back in the MOTM days, but this involved sourcing all of the parts and assembling the module. There was a major hurdle to make sure that all of the components were correct and would fit annnd I had very limited SMD experence.
Functionally it worked the first time I powered it on, but I did have a few bad connections on the shift registers used for illuminating the LED buttons. Also there was a later board modification required to make sure 12v didn’t leak out when plugging in the 2nd gate output.
Disassembling the panel and reflowing the SMD chip packages did the trick to get everything illumimating
A quick slice of a trace with a razor blade and soldering in a “bodge resistor” and the quantizer was back to two channels of awesomeness… now I’m seriously thinking of upping the resistance on those eye bleedingly bright blue LEDs!!
With my brother and his kids in town we did some thrift store shopping to pass the time and explore the Tower District
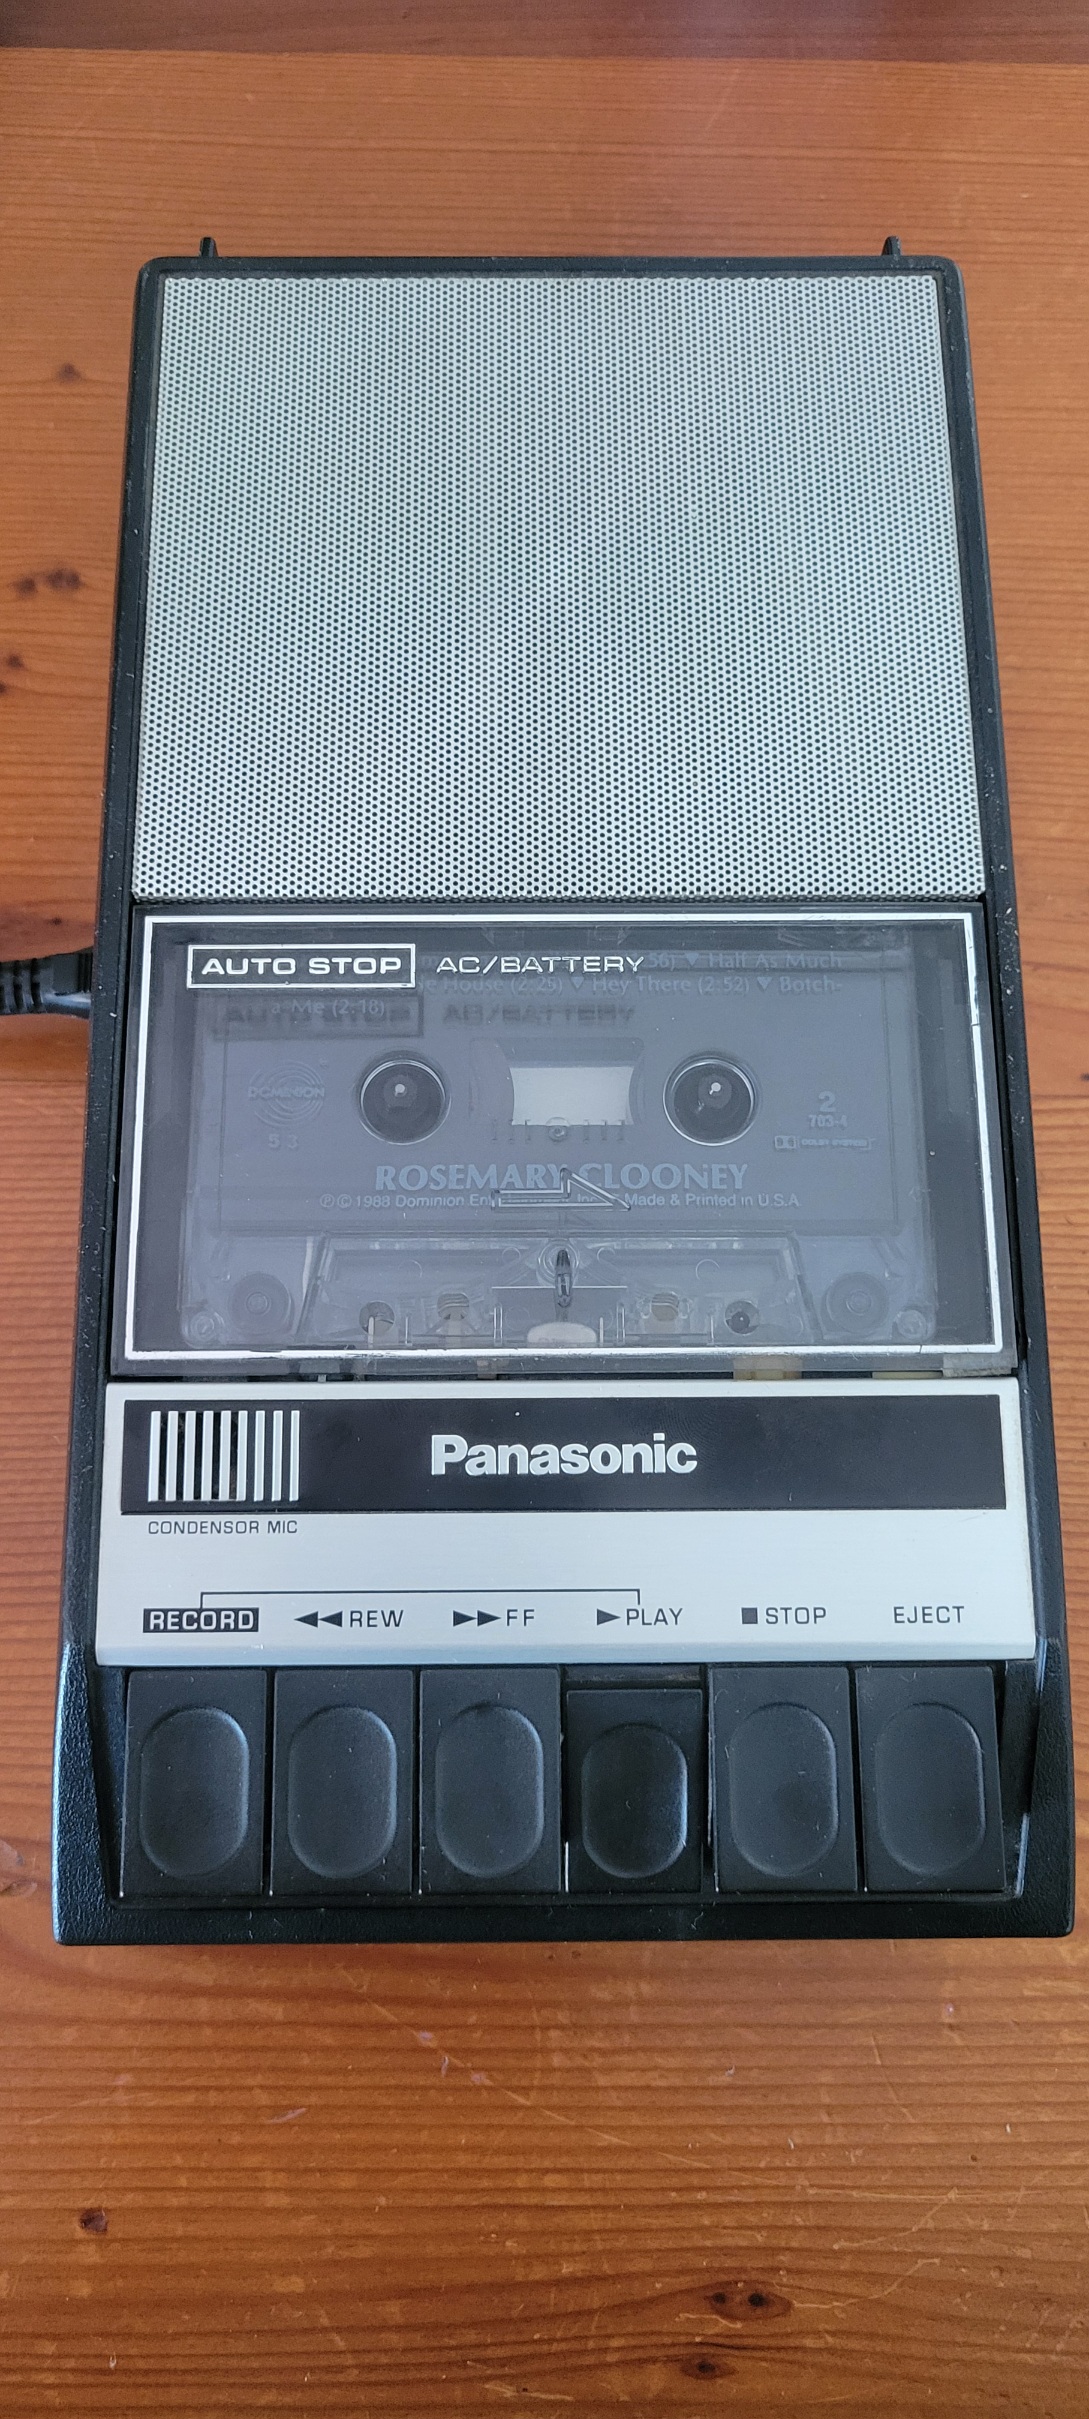
At the Neighborhood Thrift I came across an old Panasonic Tape Recorder that was in decent shape for $10. It came with the power cord and dictation microphone, so I purchased it and we enjoyed the rest of the afternoon with Mexican food and general silliness.
I had a chance to try it out and the tape was playing double speed, but otherwise worked fine.
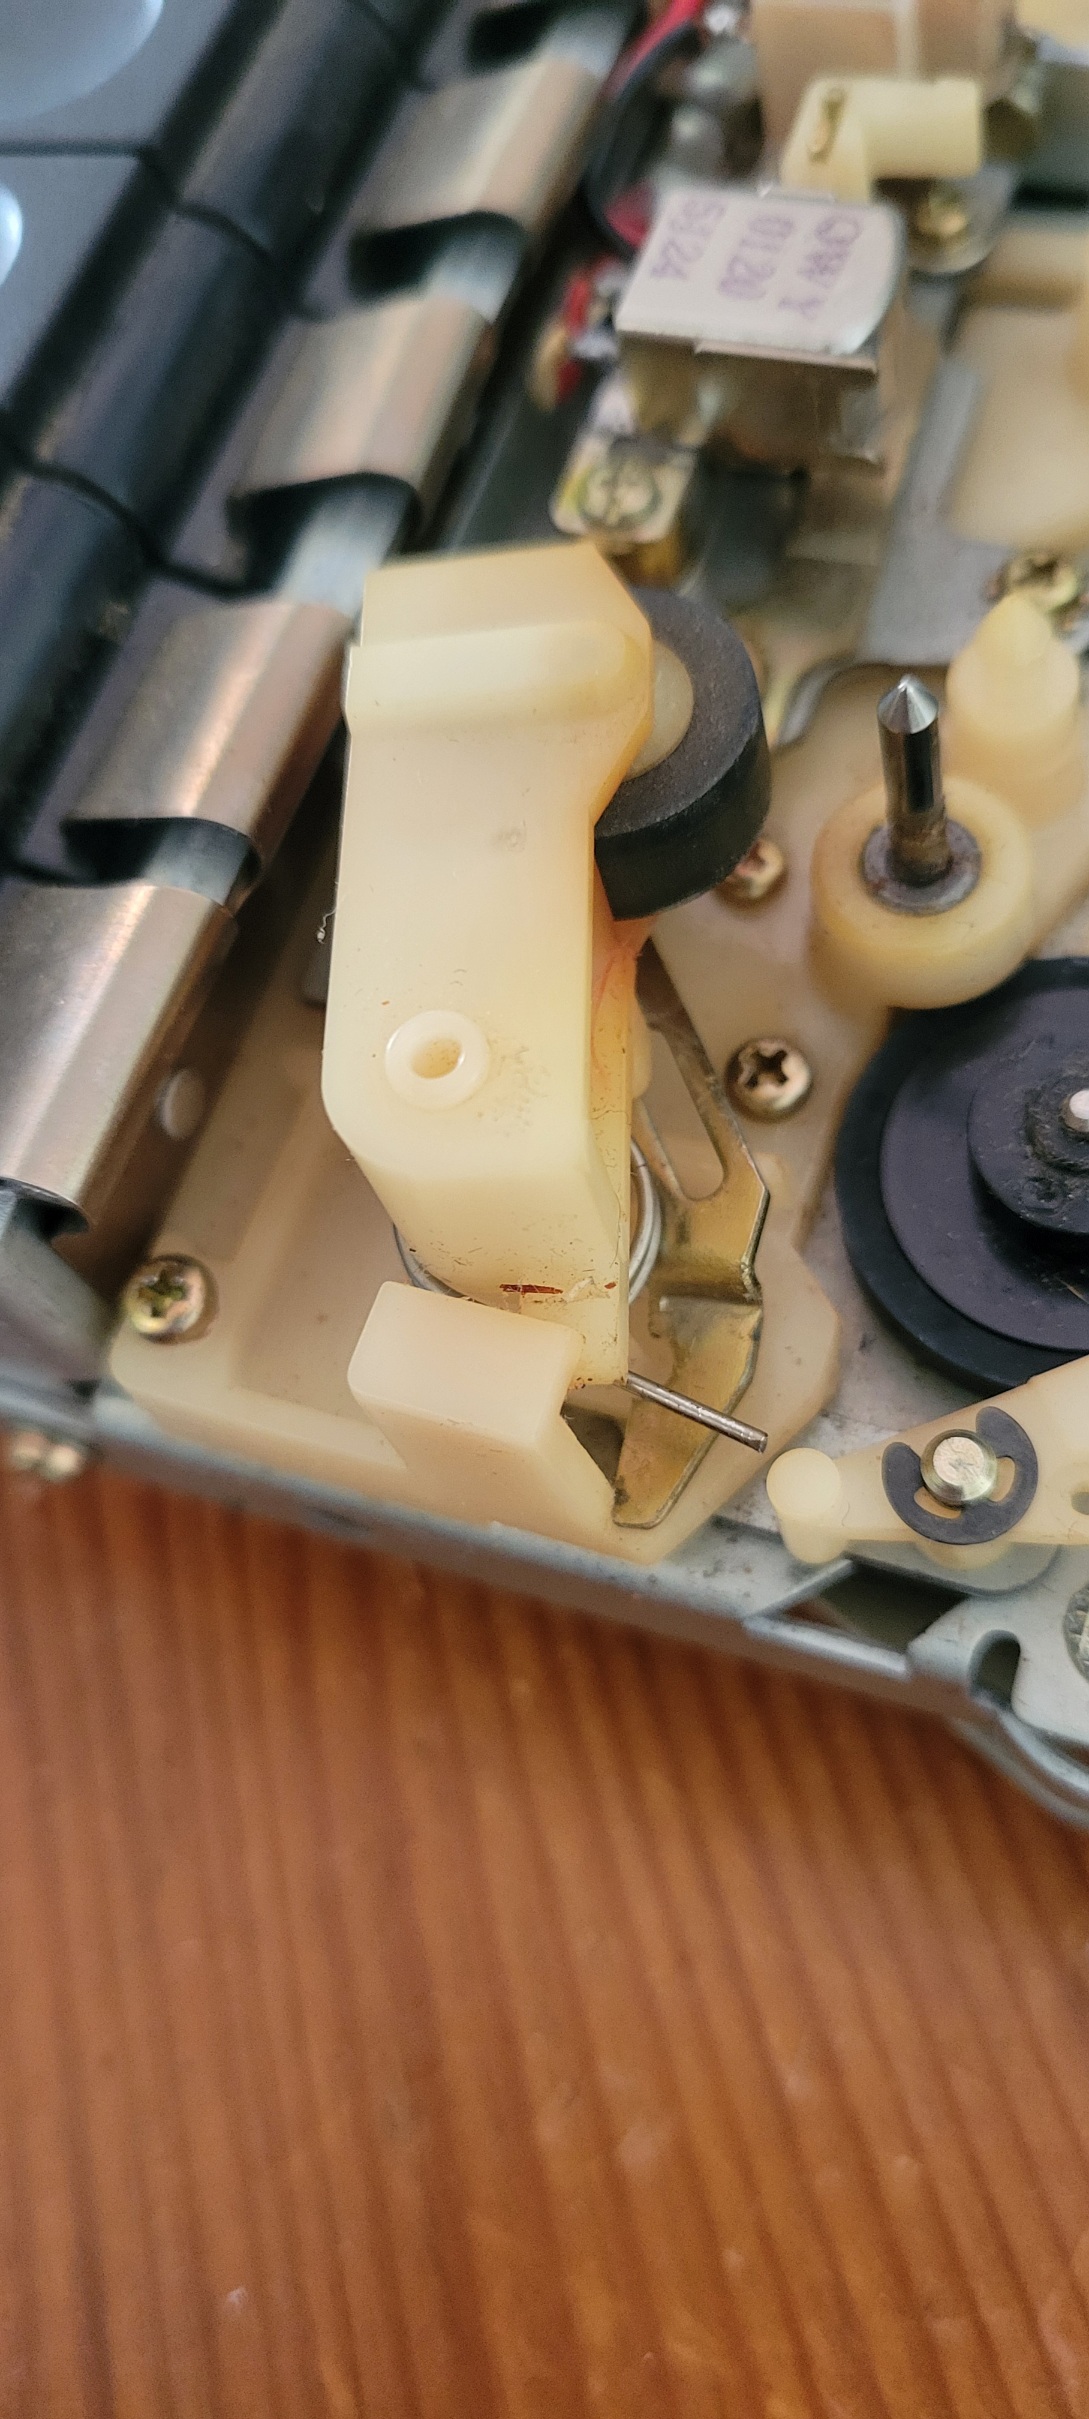
Looking at the mechanism the pinch roller wasn’t contacting the capstan.
It was a quick fix to retension the spring and get the play speed back to normal.
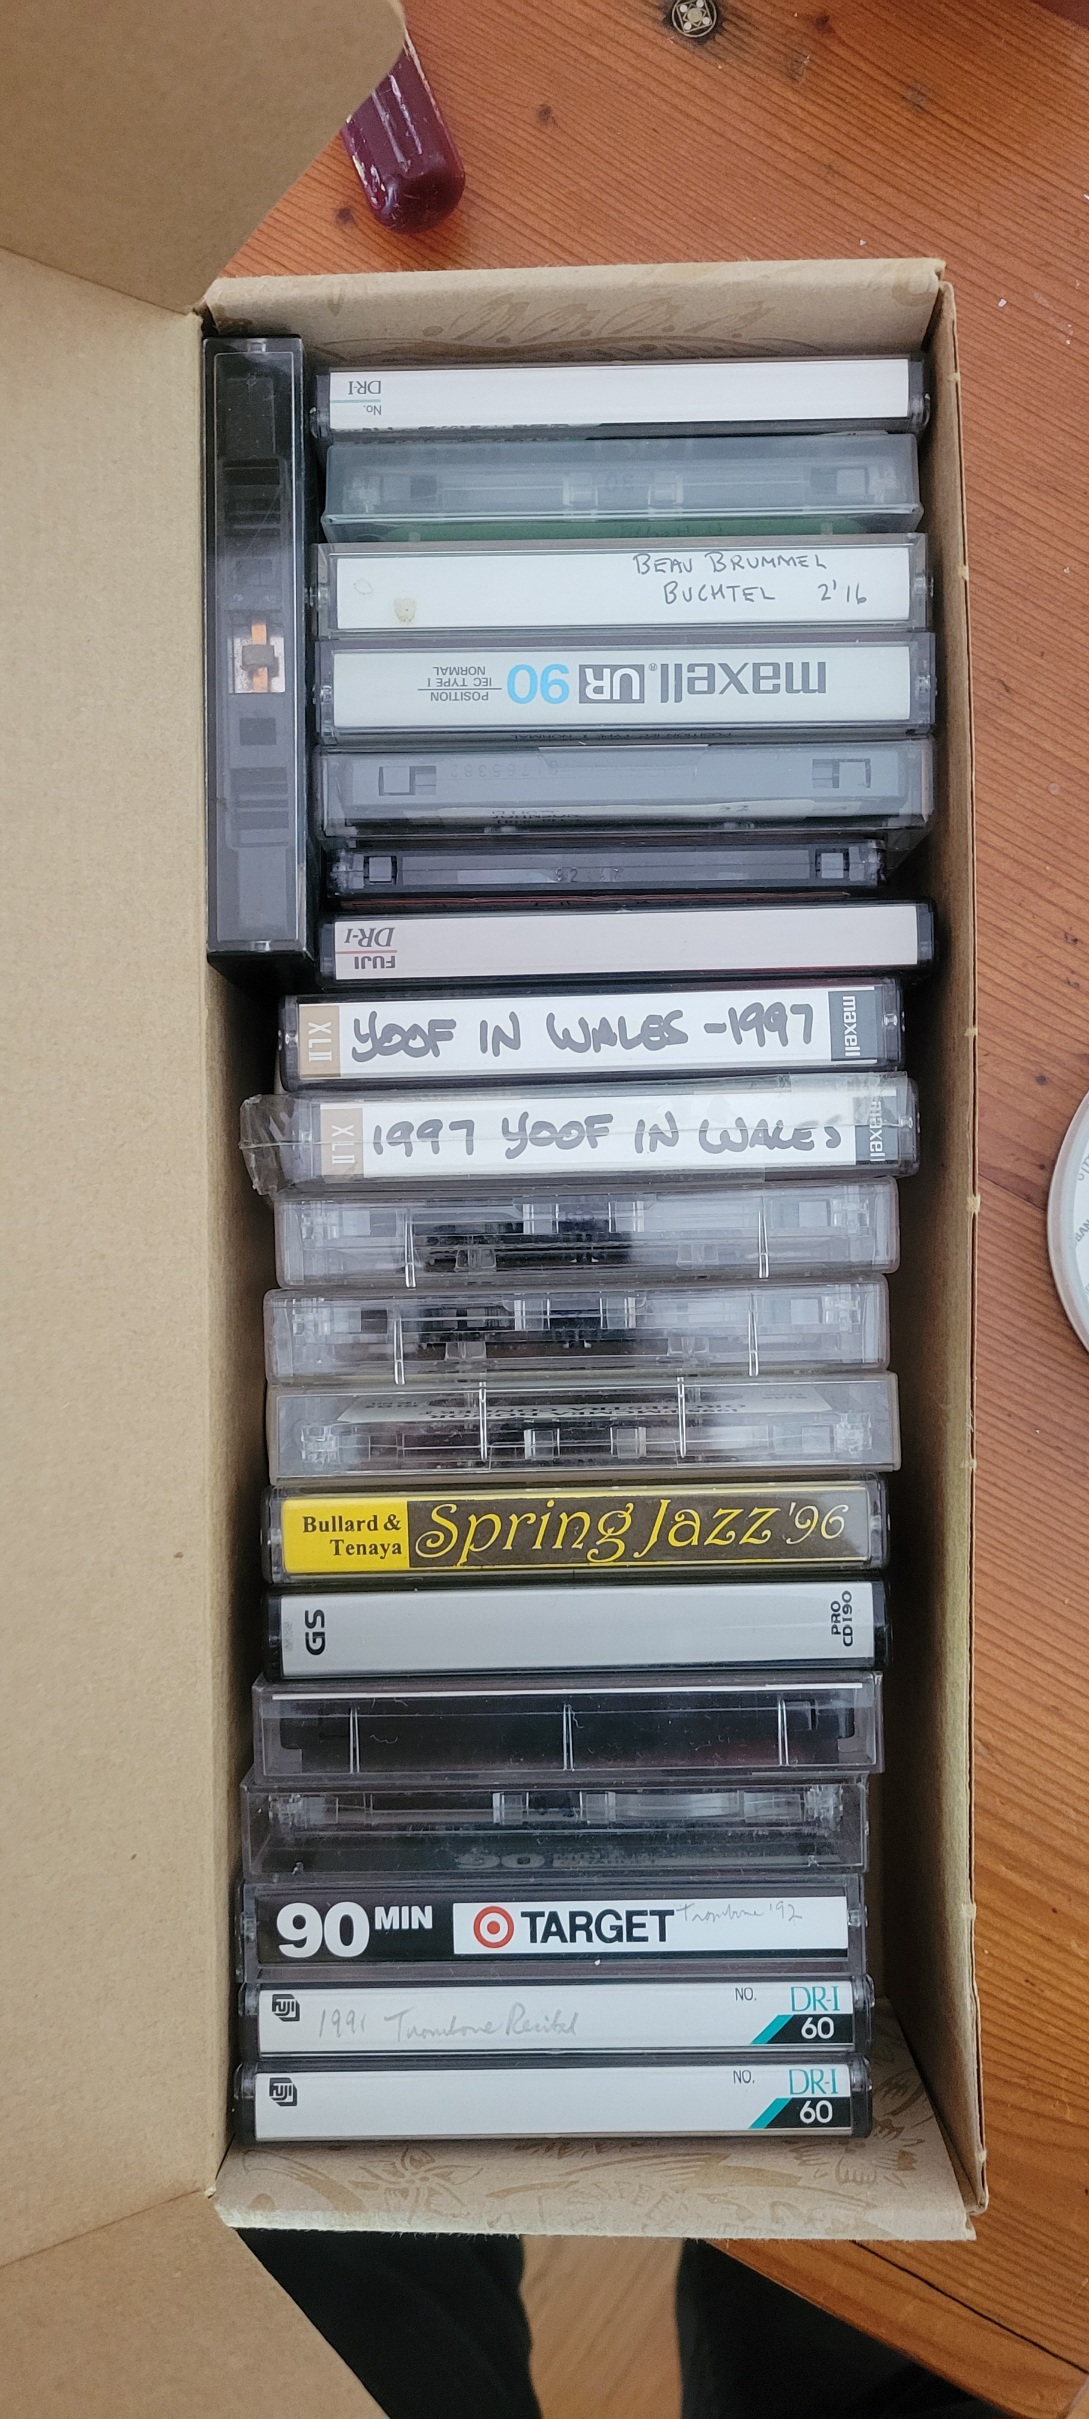
Now that the tape recorder is working, I had a chance to hear some old recordings including audition tapes as well as recordings from Orchestra trips to Europe.
Audra and I also had a chance to test the dictation microphone with a Father/Daughter duet singing ROSÉ and Bruno Mars’ APT.
Always fun to give old stuff new life and share the experience of playing with audio.
Looking at the short improvisation from a few weeks back, I decided to use a tool to convert audio to MIDI. Why? Well this would be my first step in starting to orchestrate the basic melody of the improvisation and take what was a brief moment in time and grow it into a fully formed musical concept.
Traditionally this would be done by transcription of the melody as well as defining the chord and song structure. This is still the best and most thorough method because human thought is going into each note as well as the relationships between the notes to the structure and theme.
But this is 2025… we can just let computers do all that hard stuff for us right? As much as I would love to have transcription skills of a 19th century music scribe, alas my abilities are highly underdeveloped.
Turning to our robot overlords, I did a quick google search and one of the first tools to come up was:
This is a free to use, browser client side, conversion of audio to midi using Google Magenta. A few minutes of crunching was all it took to convert the audio file into the following MIDI file:
The results are not pleasant to listen to, but the basics of the notes are mostly there, the general rhythm, and the structure. This is a rough equivalent of if I were to go and hammer on a MIDI controller keyboard for a few minutes, but instead it’s gleaned from a (crappy) recording on a real piano.
The next steps would be to start to map this to a BPM, time signature, key signature, and song structure. Fixing bad notes comes next as well as chord harmonization and playback through MIDI instruments to look at timbre of sounds that fit those voicings.
Looking forward to spending more time on this and happy for now to have the rough transcription knocked out in a few minutes.
A few months back during the holiday break, I had an opportunity to reconnect to some old friends on IRC via Libera.chat and my memories of a Common Lisp library for scoring music called Gsharp were revived. Not bad after 22 years.
I attempted to load up the old software, but the graphics library that it’s built upon, McCLIM, has had some real development done in recent years by Daniel Kochmański and team. They’ve been keeping that direct lineage of the Symbolics early and revolutionary graphics interface going and subsequently the old Gsharp code needed too many changes just to half render.
In stepping through that process I had a chance to discuss the current state of Common Lisp as well as Gsharp’s creator’s vision for a new library for music scoring along with some of the changes in Lisp Library support and some big happenings in the big wide world of musical fonts.
I decided it would be fun to try and crack into this, since it combines a few of my passions into a single coding project. First, I needed a way to load fonts into a Common Lisp graphics system and render them to the screen. Here is where Daniel and team’s hard work of building a TrueType font backend to McCLIM came in handy and so I got to work in making a simple proof of concept.
CLIM is a really interesting design based upon the Common Lisp Object System, which is one of the most pleasing object oriented implementations to use. It’s a big and robust system with a very open design that allows for a ton of customization and flexibility. The spec is rather huge and I remember being kind of overwhelmed by it all many years ago.
I’ve since had two decades of professional and amateur coding experience with Common Lisp and coming back to this spec is still a lot to take in. Talking with Daniel, Robert Strandh, and I few others, I was able to cobble the couple lines necessary render a TrueType font out to the screen. Now I just needed a music font.
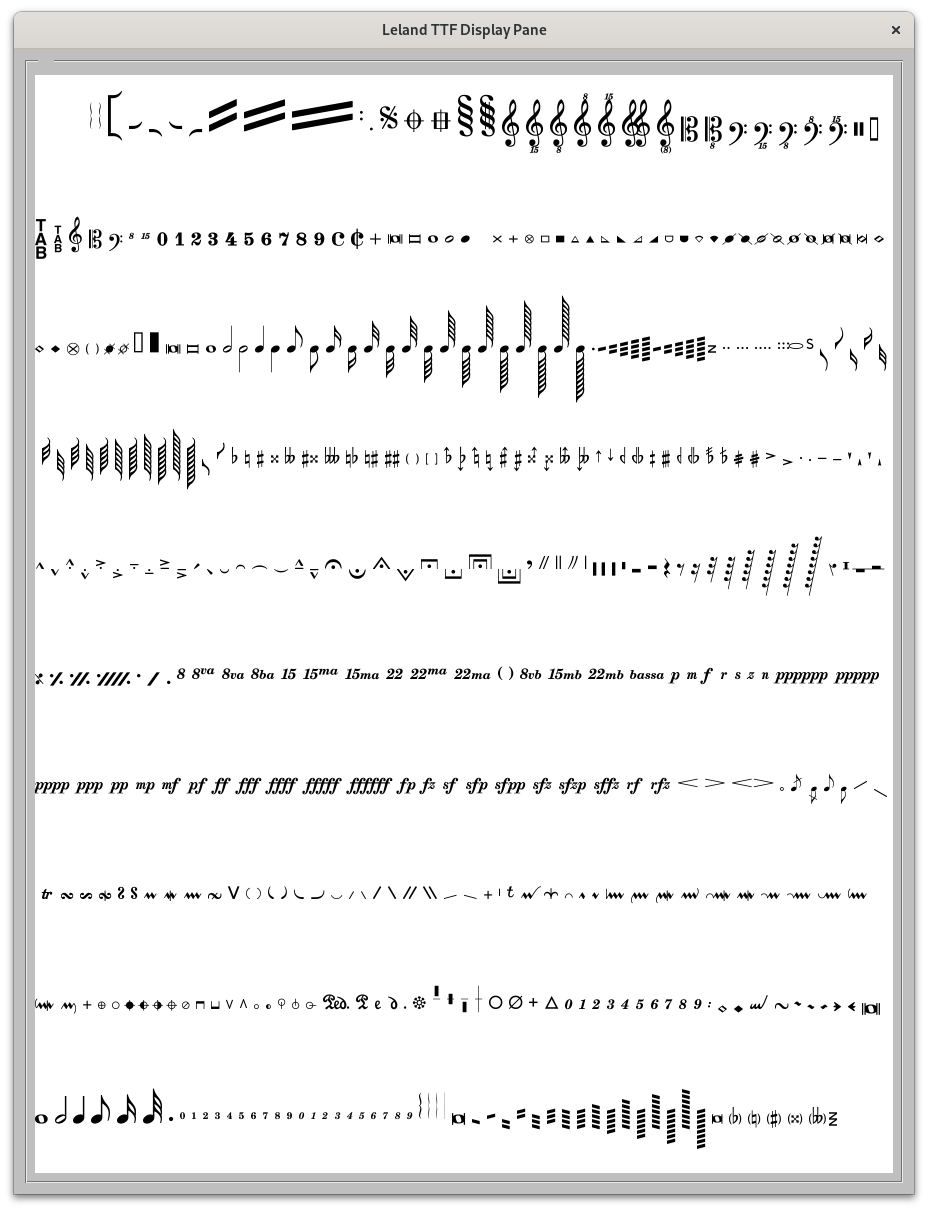
The game changer in the world of music fonts is the W3C standard called SMuFL, which defines a set of glyphs (plus relationships, ligatures, sets, ranges, attributes, engraving, and registration details) in a standard way, so that fonts can be used across various scoring software. These fonts typically use OpenType font files, which are an extension of TrueType.
Attempting to load OpenType fonts using the ZPB-TTF library didn’t work, so instead I changed tact to converting the OTF files into TTF files using FontForge, which ZPB-TTF could read, and subsequently McCLIM could render.
The problem with converting OTF fonts to TTF fonts is that OpenType allows for the SMuFL metadata to be stored in the font directly. This important information is used to properly render and position the font in a viewpane, but during the conversion to TrueType all of this information was lost.
As much as I would like to extend the ZPB-TTF library into an EAJ-OTF library, it is a non-trival undertaking for a future-future date. Instead I chose to examine the JSON files that accompany the SMuFL standard as well as each compliant font. These JSON files provide all of the metadata typically stored in the OTF font itself for other font types such as SVG, WOFF, etc.
Using the JSON definitions from the SMuFL spec and Bravura the model font that the spec was built around, I was able to build out a library to parse all of the font metadata and load it in such a way that all of the definitions and associations could be made between glyphs. There 13 main phases to loading a SMuFL font, each with a need to pull in data, cross reference and build out the font metadata for general use.
After doing the proof of concept, I dug into the SMuFL spec and started writing code to parse and relate all of the JSON data. The result is a library called Cloveleaf:
Cloveleaf allows for a TTF metadata font to be defined, loaded, and prepped to use by other software. The ultimate goal is to create a cloveleaf backend for McCLIM to allow the TTF fonts to be rendered using the correct positioning, ornamentation, and clarity in order to make a useful, readable scoring application.
The immediate goal for Cloveleaf is to get unit tests written, correct issues in trying to load lesser compliant SMuFL fonts and then look at OpenType support. If you have any comments or suggestions, please leave a note below.
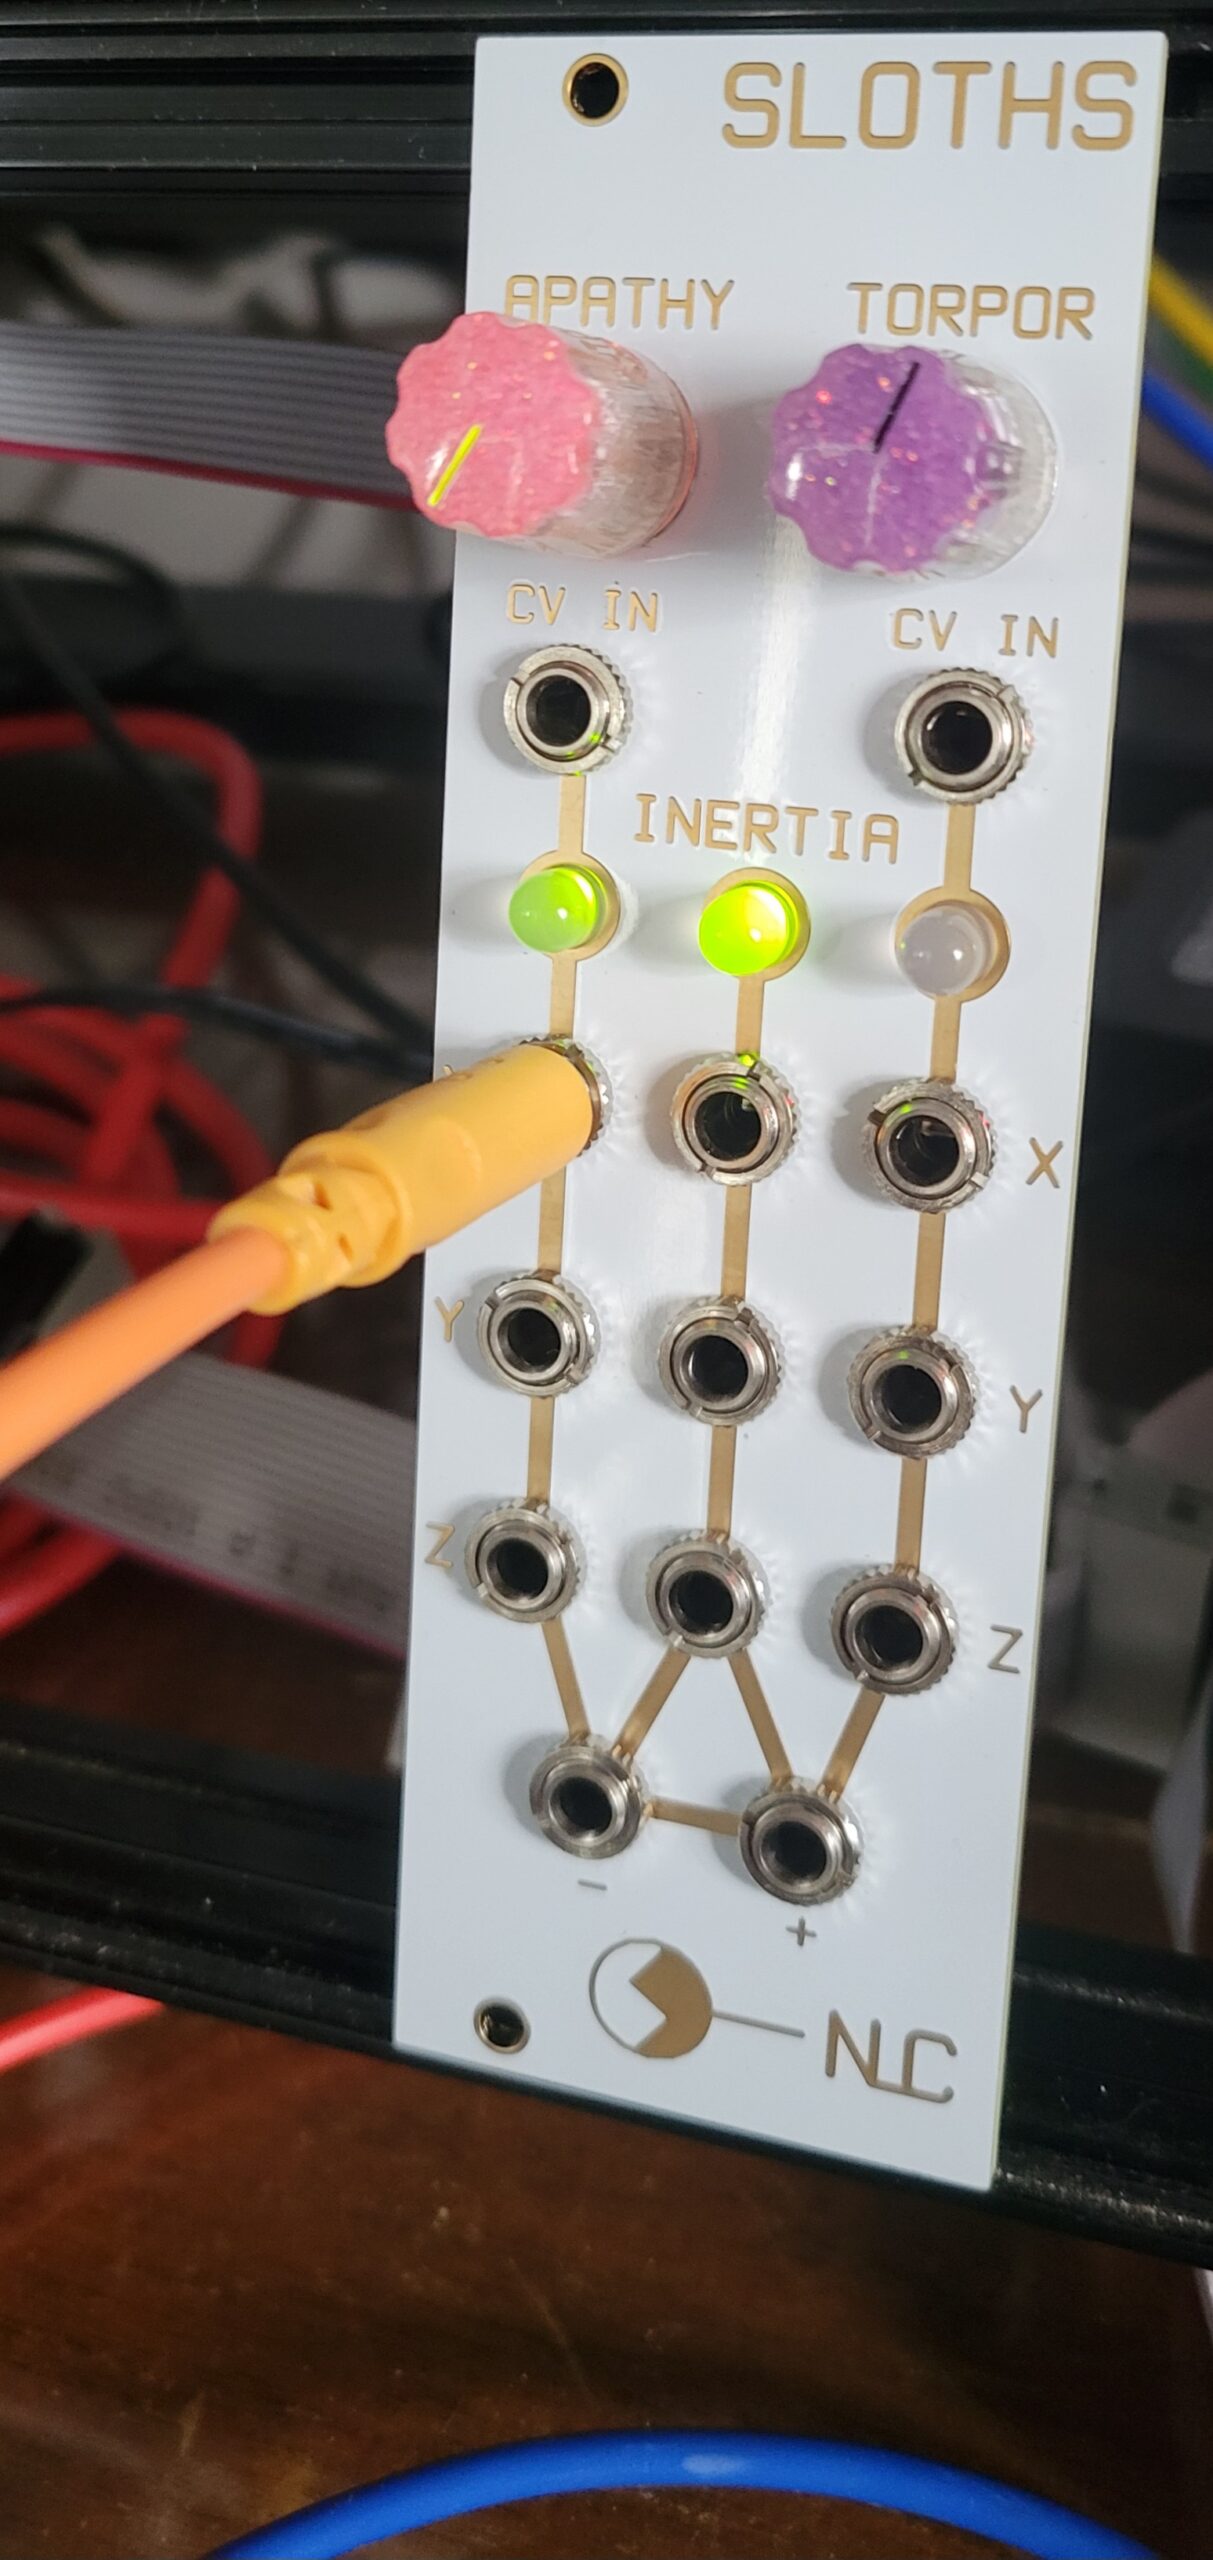
My triple sloths module, which is an amazing source of chaotic modulation, took a dive.
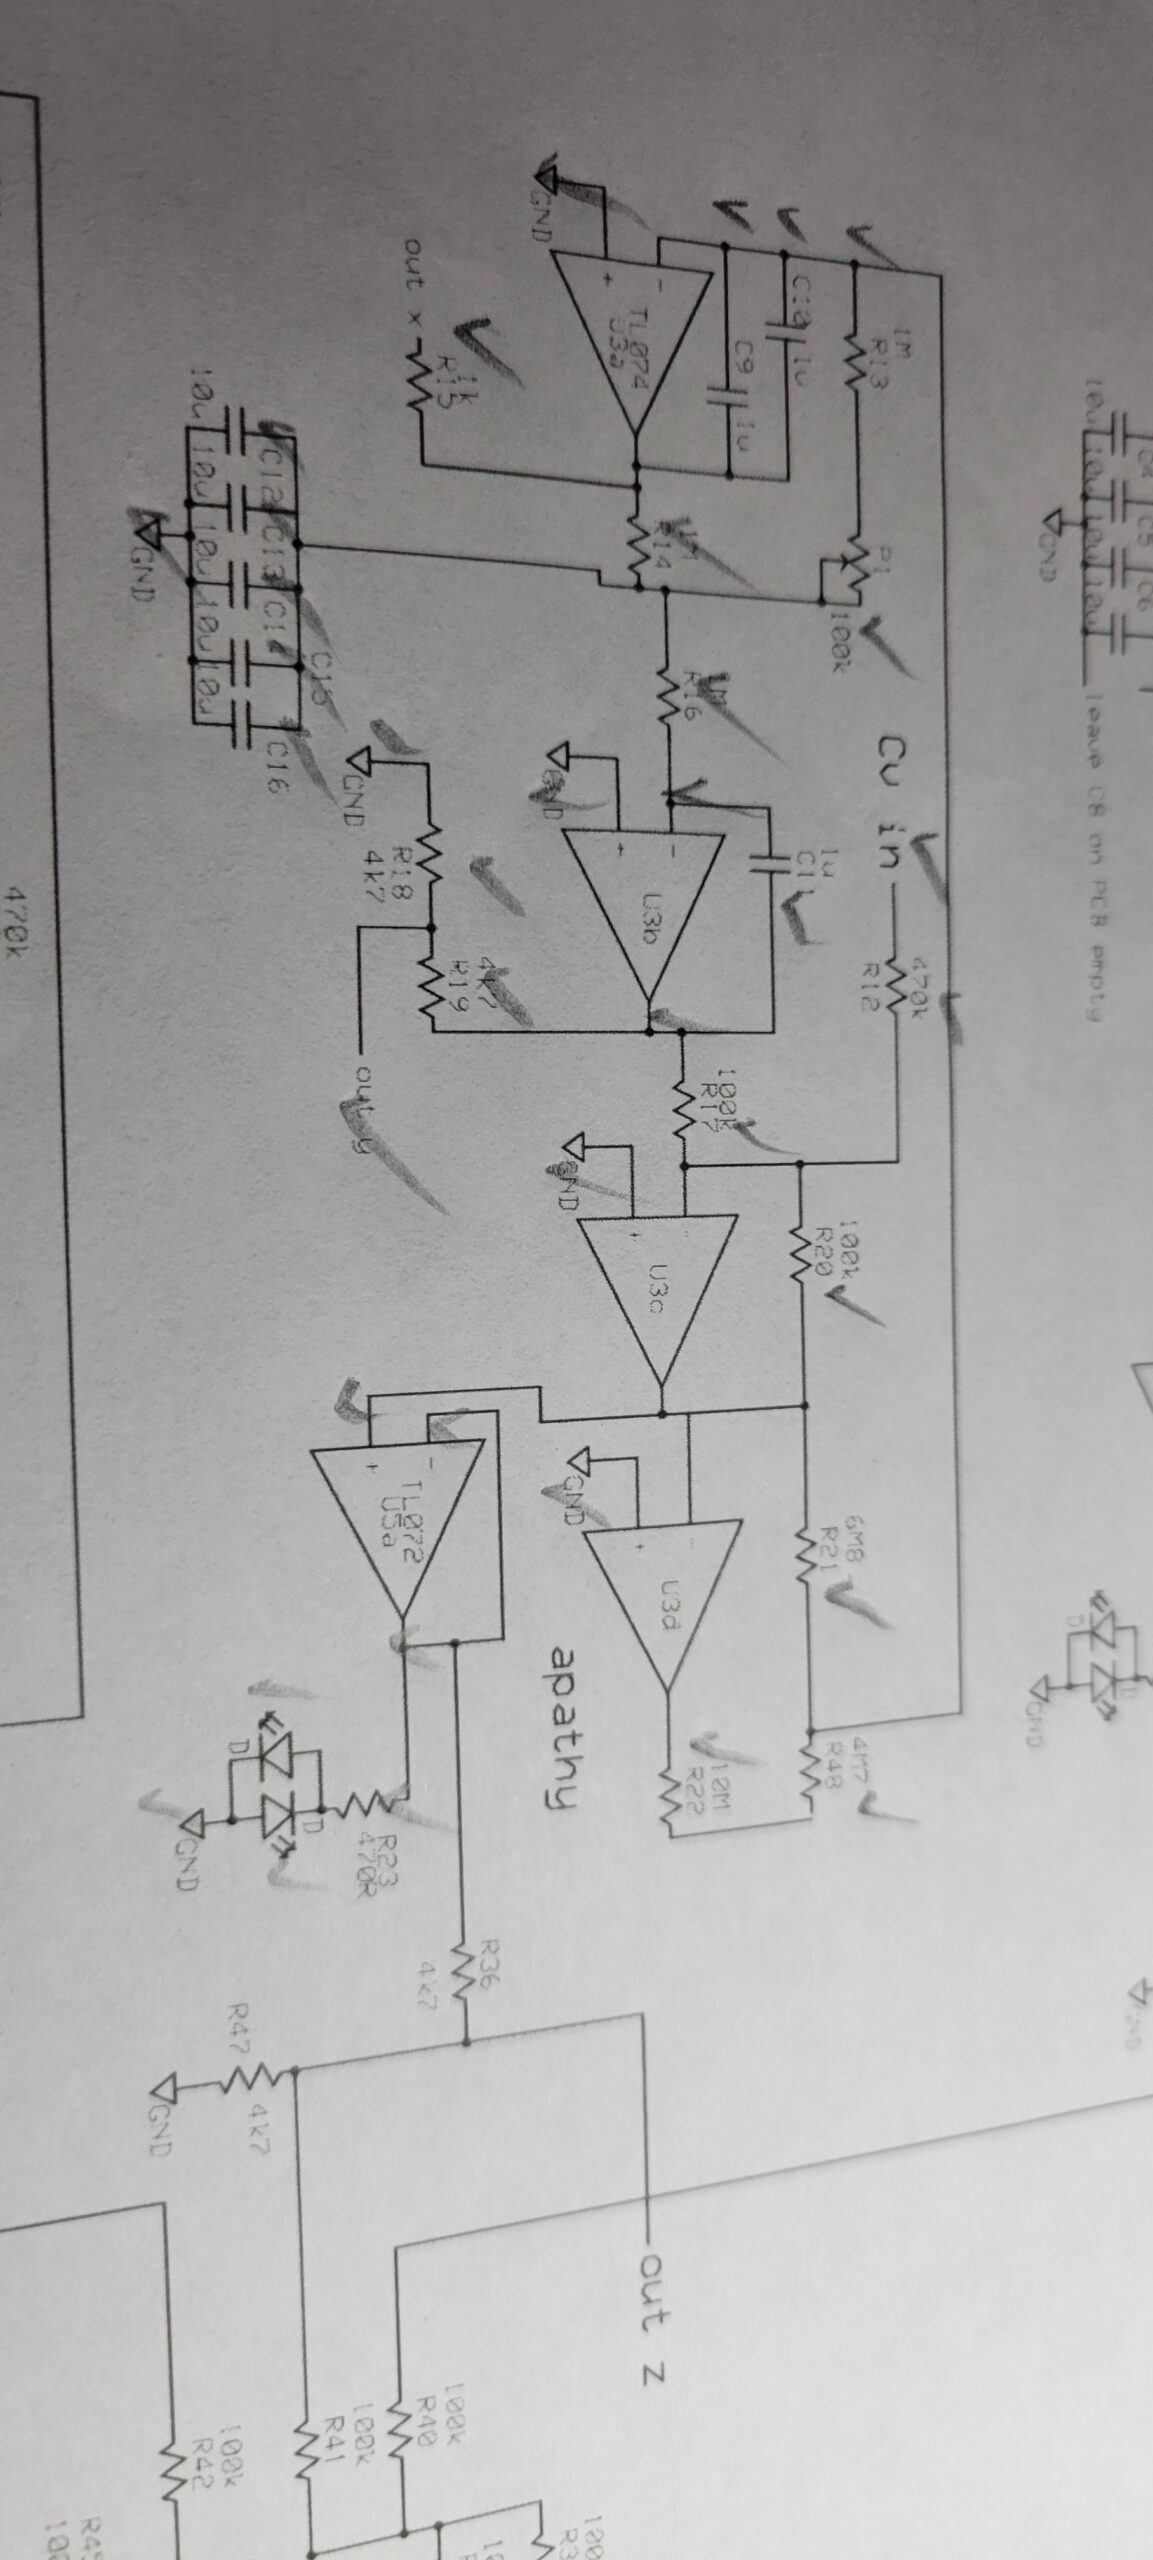
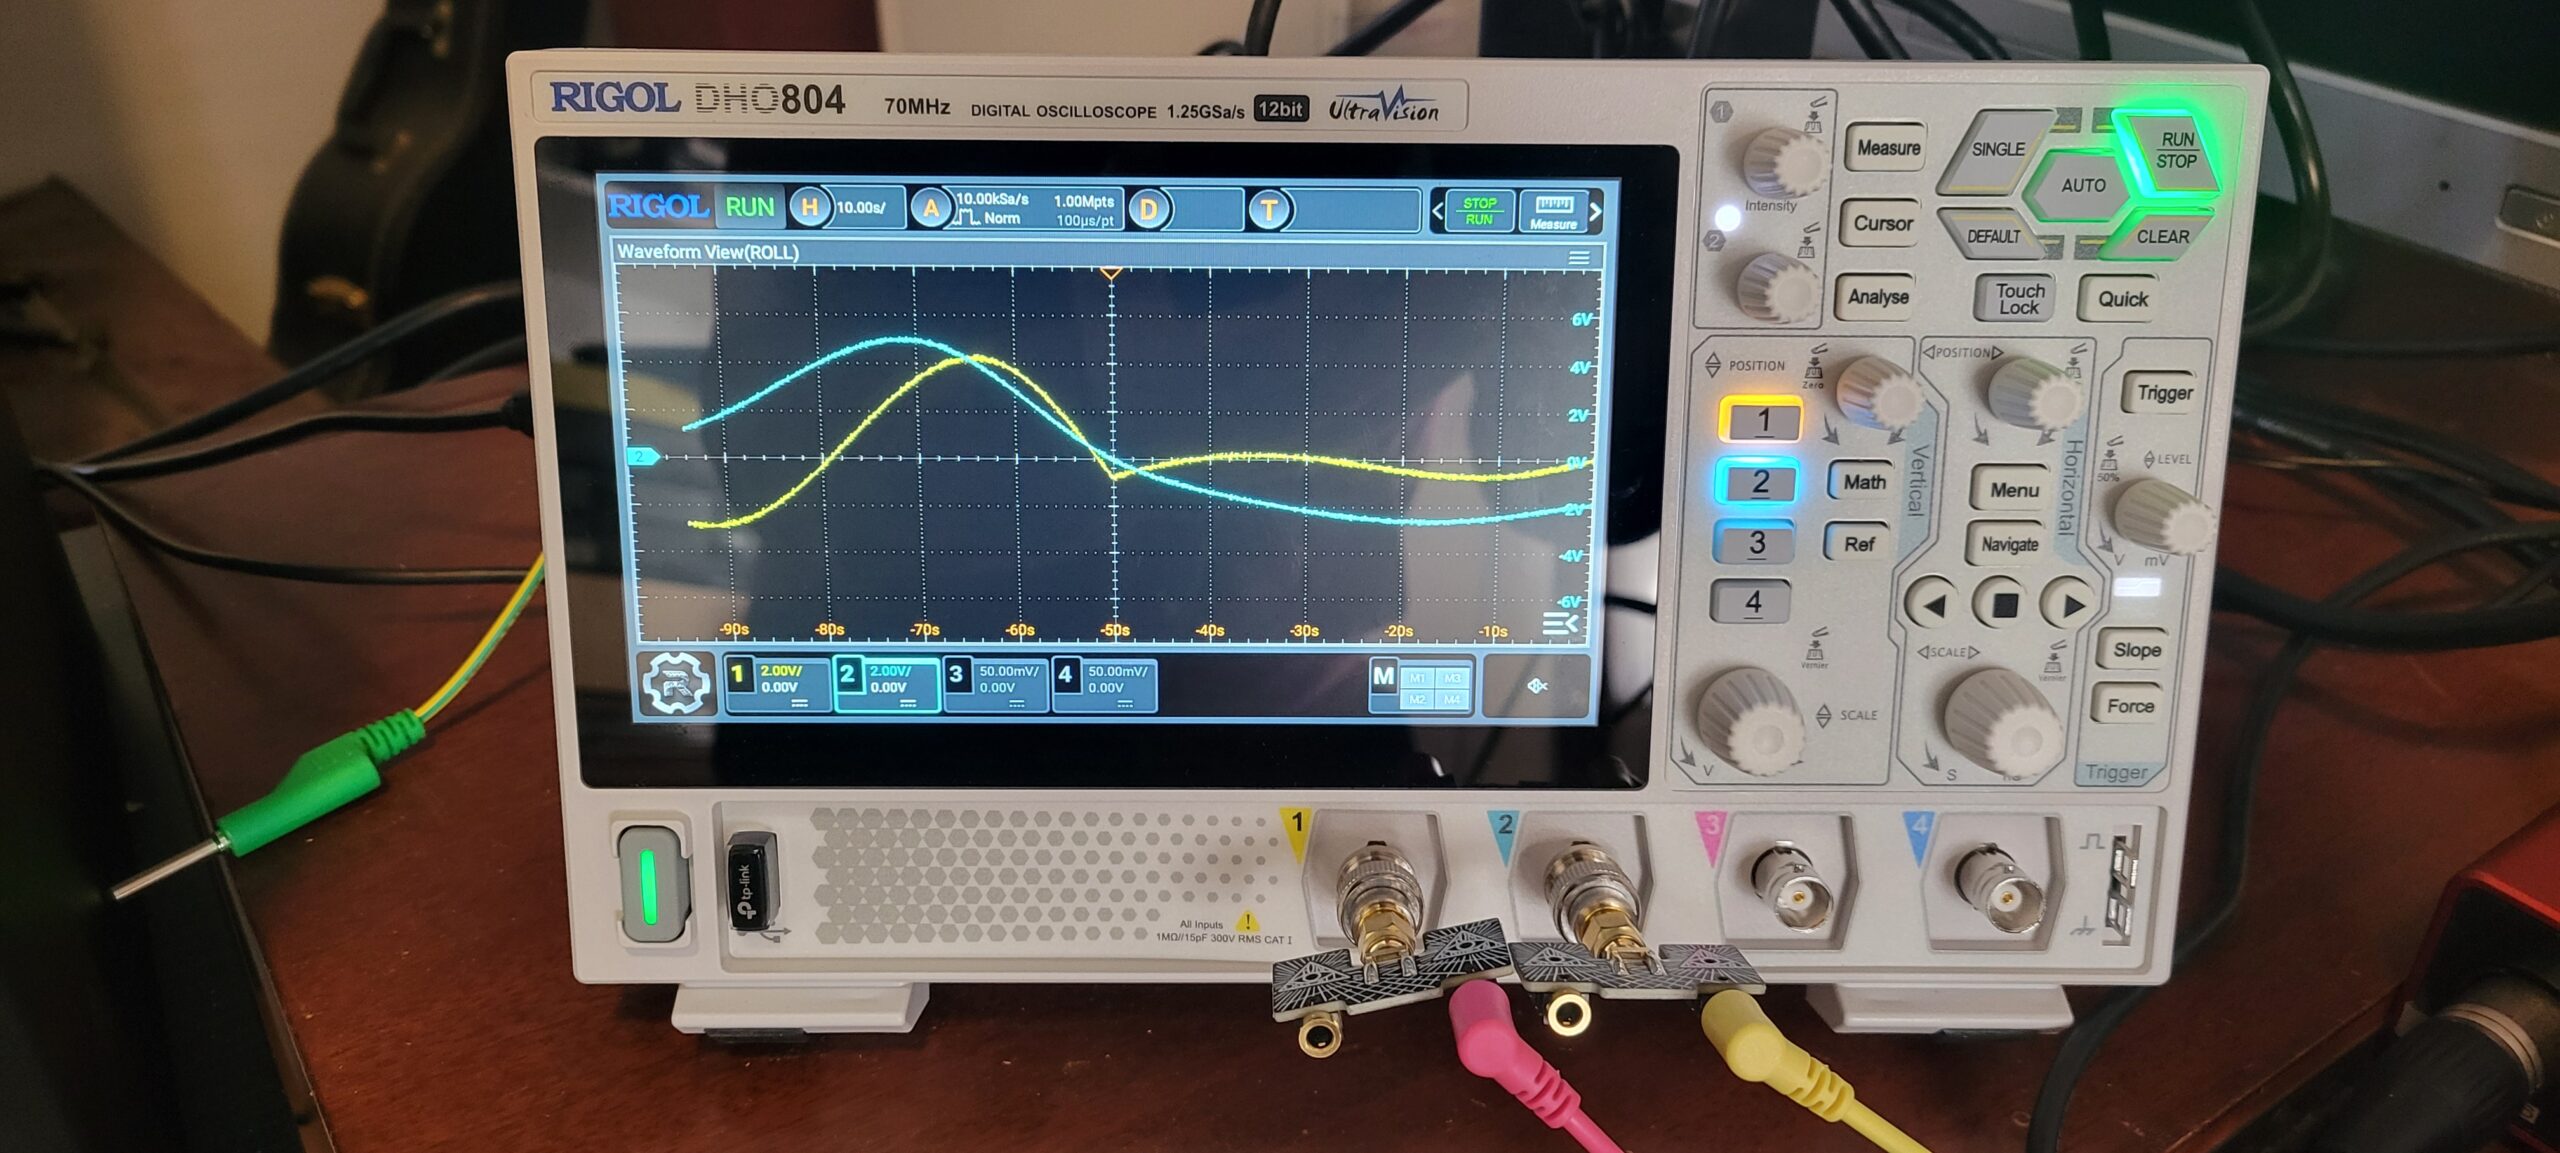
The module initially worked, but the “apathy” portion of the module recently started outputting a constant -12V instead of the ever undulating voltage that I’ve grown accustomed to using in practically every synth patch.
On President’s Day I had a moment, so I visually inspected the board and all my hand soldered SMD connections looked OK. I verified all of the values of the resistors and the position of the ICs. Using the multi-meter I also confirmed all of the connections in the Apathy circuit to ground and the voltage supplies. Everything looked good.
At the end of all of that I wiped down the module to remove all of the left behind solder flux. Plugging it back in it worked!! Great, all done :)
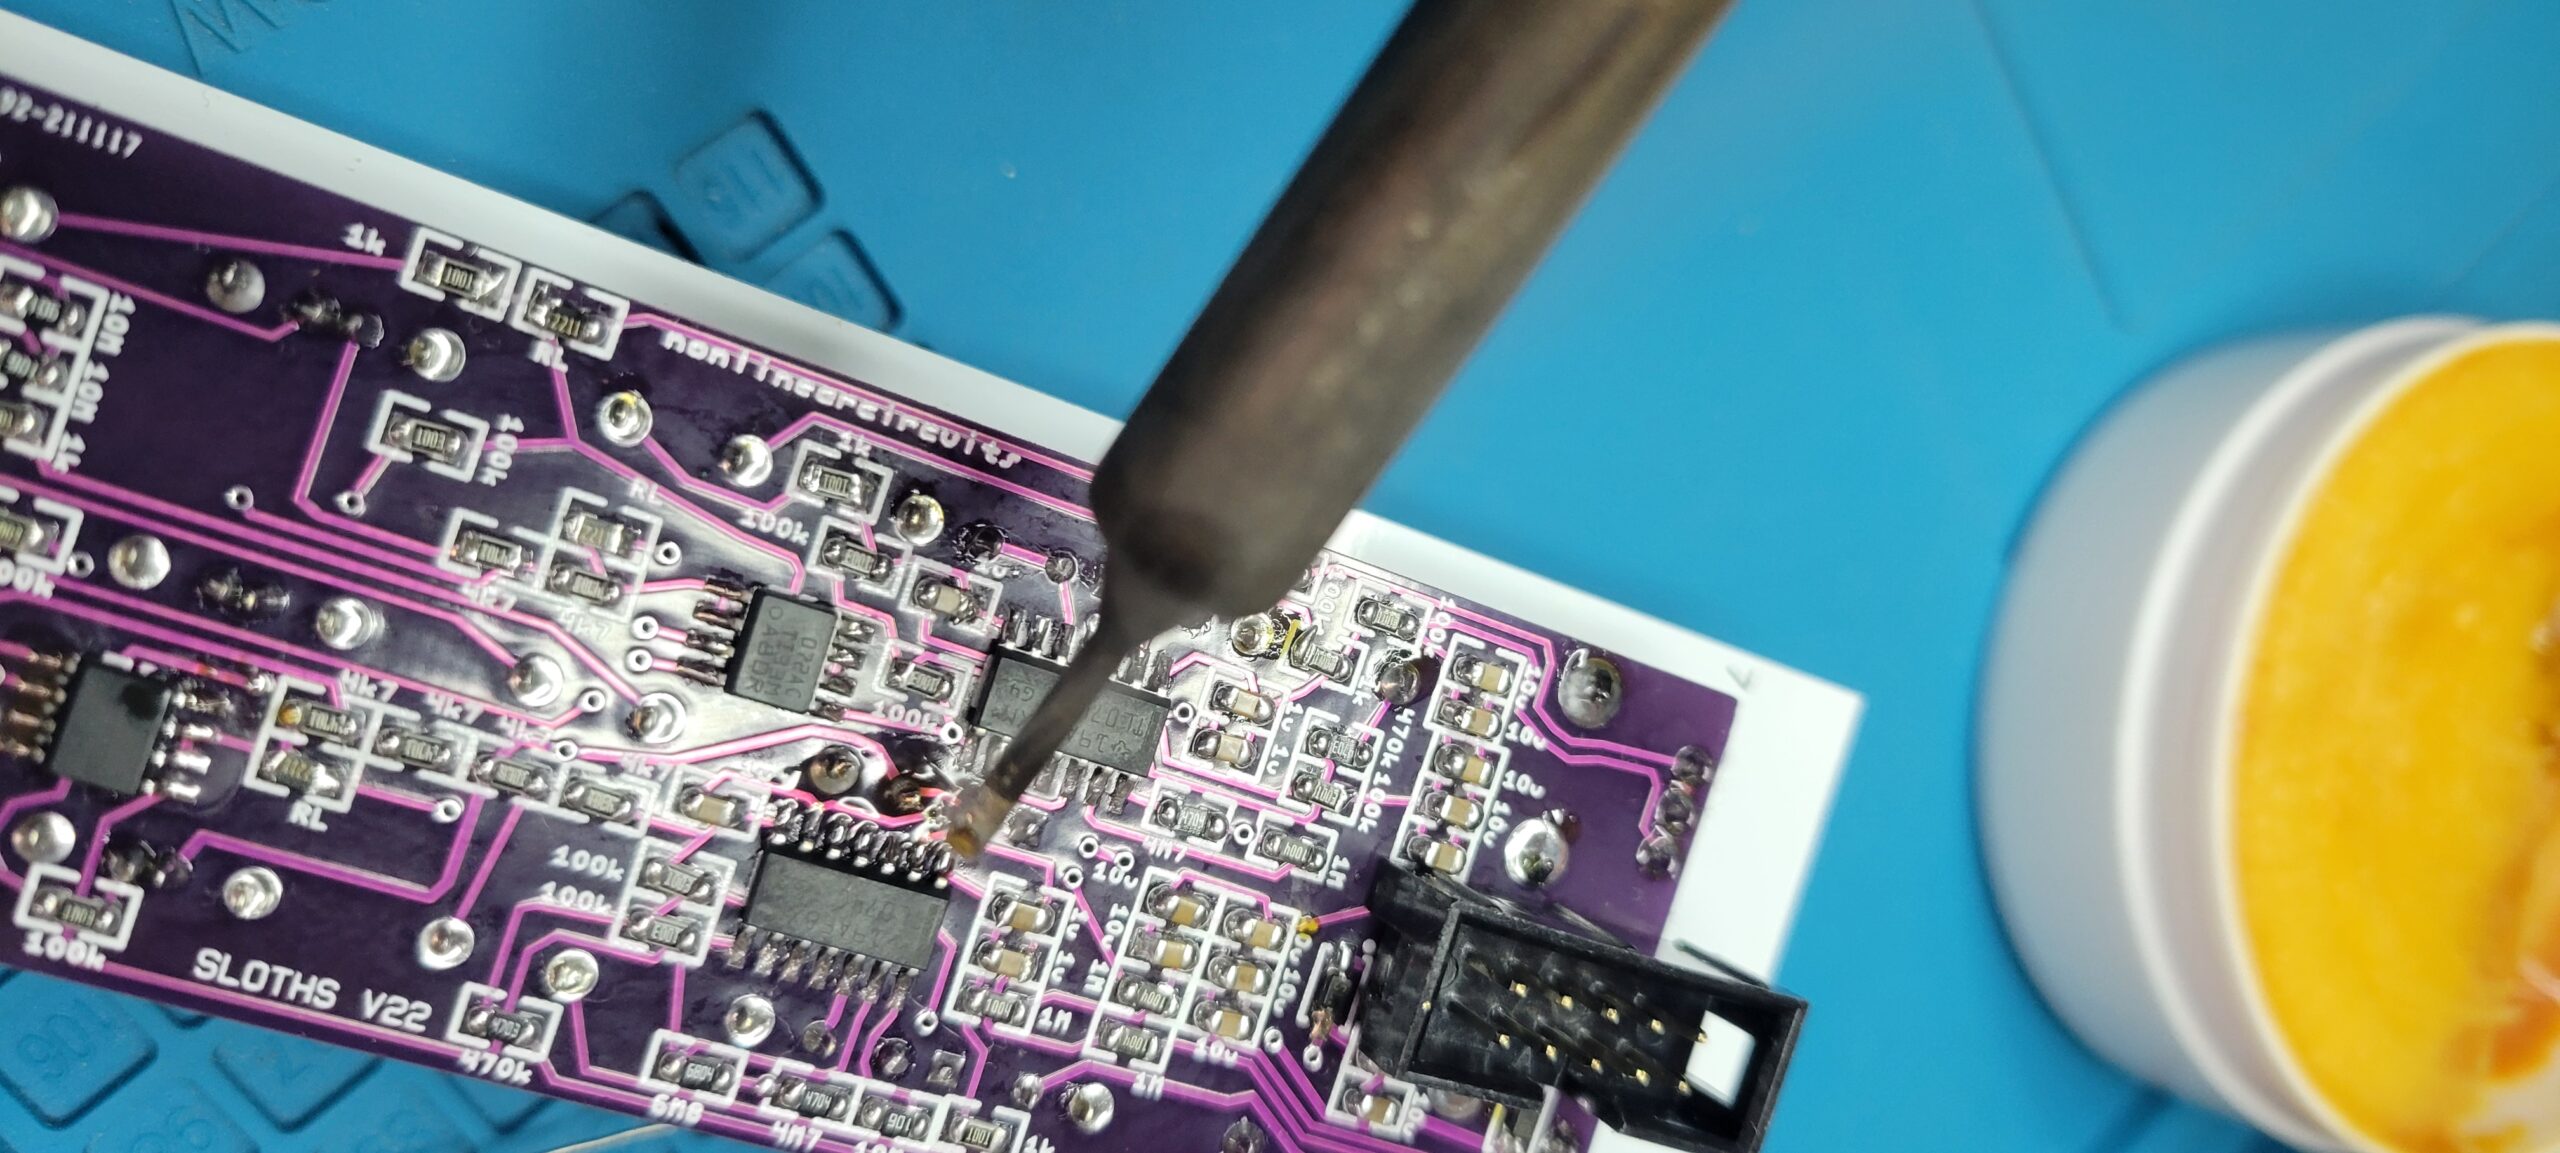
Of course that wasn’t the end of the story, because after adding a few cables it went back to not working. The fact that it was intermittent was an clear sign that it was a non obvious bad solder joint.
Re-flowing the solder with lots of flux was the next step and greatly improved the soldering around the ICs. Another quick wipe down with flux remover and it fired right back up and ran as it should.
Happy ending, nice smooth modulation and back to making music.