August 21st, 2009

Got into Fresno on the 718 train at ~11pm (late as usual).  At home were a few packages waiting.  My POR 15, stale air cleaner triangle from Greg and Clara, and a 40hp air cleaner that was in shabby shape.  The POR stuff look good and they even tossed in free spray bottles for the Marine Clean and Metal prep.  I’ll see how well the POR15 thins and
sprays as my brother Tom left me a Snapon paint sprayer.

The triangle looks good and strong.  It’ll think I’ll give it a coat of black paint :)

The air cleaner was in bad shape.  There are rust and dents all over the surface and the worst part is that there is a rubber patch in the bottom of it with poorly applied solder on the bottom to try and contain it.  I know I got it for about $50 less than the NOS ones, but
this probably needs more than $50 worth or work.  Luckily I have one more welding class, so I’m bringing the part with the patch in for some small welds and grinding off of bad rust.

My Mom, Dad and I caught up and talked a bit.  I went out to the bus and tested the fit of the air cleaner and also looked around the cab a bit more.  After seeing a rat infested bus’ fresh air duct I kind of wanted to get in there to see what mine was like.  It looked pretty
easy to take off, so I undid the screws to find that several had plumbers tape on them.   I don’t think they came that way from the factory.  Once they were off I tried prying off the cover plate, but it was really stuck on by some old rubber.  I kind of gave up after the metal seemed to be flexing, since I didn’t want to bent it out of shape.  I ended up putting the screws back on and calling it a night.

August 1, 2009

Slept in late as usual on a Sunday morning and got a call from Madalynn’s dad, who was going to leave early that morning for LA to go to the Getty Museam.  I’d borrowed his Cannon, 70-200mm, 2.8f USM IS L lens for use photographing my friends Anna & Baimba’s wedding and needed to return it.  I also had made plans to go to Bruce’s shop and meet him in person and Bruce told me on the phone that he’d be able to do 10am.

I got the bus ready for it’s first delivery and went to fire up the engine.  It would turn over, but wouldn’t start the engine.  My Dad drove his Tarus over and we tried to jump start it, but it still wouldn’t fire up.  After a few minutes we decided it was best to leave it and go with the Tarus.  I got to Randy’s a few minutes later and ended up talking for about an hour.

Afterwards I headed back home and tried to fire up the bus to go over to Bruces’, but it still wouldn’t cooperate.  My Dad and I headed over and met the crew that hangs out at Bruce’s shop on Effie.  He’s a nice guy and has a great setup for hot rodding vws.

When we got back to the house we decided it was best to test the new starter.  So we pulled it and the battery and went over to Sebring West, which tested both and the hybrid starter worked like a champ, but the battery was at the end of it’s life.  Rod at Sebring said if it hadn’t been charged before that we should try charging it.  I picked up some engine tin seals, which my bus is missing and some odds and ends like a fuel filter and headed back home.

By this time it was 3:30pm or so and we stuck the starter back in and tried jumping it again.  This time my Dad connected both terminals on both cars (a practice that we always thought wasn’t correct) and this time the jump started the bus.  We fit the rear apron on and bumper and cleaned up a bit for dinner.  Basically a minimal day of work on the bus, but we knew that the Hybrid starter that Wayne built was strong and the root of our problems was a bad battery.

After dinner we headed off to the train, only to find that the 5:50pm train was really 5:45pm, so we got to watch it pass us as we waited behind a crossing guard.  Amtrak put me on a later train and I worked out a situation with my friend Josh to stay at his place in Jack London Square since I got to the train station at 12:10am.

With the extra 2 hours to wait we headed back home and using razor blades with a mixture
of laundry detergent, windex, and water we were able to scrape off the 3 layers of paint on the back window.  We found the sekurit logo in the upper right hand corner, so it was original just like all the other glass.  Hopped onto the train just after that and made it to
my friend’s place for a short nights sleep.

July 31, 2009: Hybrid starter + T2 air cleaner = Driving!

Packages that arrived:

  • From Wayne Johnson:
    1. 6/12v hybrid starter
  • Wolfgang Int:
    1. 71-79 master cylinder
    2. vw rabbit reservoir
    3. converter kit (spacer + screws)
  • Eastwood
    1. speed blaster
    2. Rust encapsulator
  • bfyobsolete
    1. fuel line
    2. door latch
    3. rear window weatherstrip
    4. volkswagen rear emblem + clips
  • 68 air cleaner

All 3 of my brothers were in town, Tom and Mom waited at the train station for almost an hour while the train was late due to begining at Jack London Square with a bum engine.

Had a nice talk catching up with Tom and got home to dinner and desert. Dad, Mom, Tom, and I talked as I unpackaged the parts that arrived. Soon Dad turned in and Mom, Tom, and I stayed up late talking and playing some of skate2. Matt and Jenny were sound asleep having traveled from Kasas City (M) and Will took off a few hours earlier being on
an earlier schedule.

Got to bed pretty late, but up early trying to get a start before the midwesterners, but they were up and about just after I got dressed.  Grabbed a bagel, coffee, the new hybrid starter, and new air cleaner.

Dad showed up a few moments after I opened the garage and we set to work preping the parts for installation. The air cleaner fit but takes up a lot of space as others mentioned on the vintage bus list.

Once we were ready we put the starter back in, which went in a lot easier than pulling it because I found a good way of squeezing it in between the heater and break lines. Dad found a good way to get a socket on the long bolt that holds both the engine and the starter on and I was able to tighten it with a cresent from inside the engine compartment. I
found just how useful a head lamp is and really was thankful for choosing the more powerful LED version (1.5 watts made by Energizer).  We couldn’t easily get out the bushing that is embedded in the transmission housing, so we inspected the old one and it looked good enough to leave in.

With the starter on we fired up the engine. It turned it over, but we had to really gun the gas to keep it alive.  Since we didn’t have the air cleaner in we decided to turn it off so that we could get the air cleaner attached.  Filled the bottom of the air cleaner with oil to the red line in the bottom, attached the neck, positioned it, put the air cleaner on the neck, tighted the hose clamps down on it and since we didn’t really have a place to hang it we used an old clothes hanger looped around the engine compartment roof support and twisted it around the air clearner at the point it connects to the neck with a pair of pliers.

In the back of my head I could hear my ex-coworker Mikey saying “Duck tape and bailing wire”, which was a common expression when we needed to improvise computer repairs.  This was really the only option for hanging the air cleaner since this bus originally used a triangular bracket to support the air cleaner off of the coil.  I’ve ordered a reproduction stale air cleaner bracket from Greg Noble and Clara Williams off thesamba.com.  I’m thinking I can modify it to fit the current doghouse fresh-air fan shroud.  Since it’s a repro I don’t feel too bad about modifying it.

We started the engine again and let it run much longer and my Dad grabbed a small screwdriver and adjusted the idle down to a much lower idle.

We rested for lunch and my brothers were talking about the Forestiere Underground Gardens tour, which I had been on a few years earlier and was a lot of fun. We settled on either a 1:30 or 2:30pm tour, which would give my Dad and I time to go pressure wash the underside of the car, which has what seems like 46 years of dirt & grease that is
difficult to even scratch off.

So we fired up the bus, slapped it in reverse and low and behold it drives!! We turned out onto Shaw avenue and went west to El Capitan where there is a large pay car wash with pressure washes. Here are a few of my thoughts about how it drives:

  • there is some roughness in the clutch with the occasional grinding when putting it into first and at one point on the return trip I couldn’t get it into any forward gears at all. I was able to pull to the side of the road and put it into reverse and after backing up I was able to put it in first. Places I’ll be checking:
    • clutch linkage
    • clutch plate
    • transmission
  • The seats have been given extra padding, which is comfortable to sit on, but I’m 6′ and have trouble seeing comfortably. For instance if I want to see the top traffic light I need to hunch over.
    • Short term fix: reduce the padding and height of driver seat.
    • Long term fix: put standard upholstery in cab.
  • The brakes feel stiff to press, but a bit soft to stop. I overshot a cross walk by a few inches and was scared of trying to stop in a more emergency situation. Things to address:
    • inspect the entire break system
    • install the new dual master cylinder as it’s dual circuit and
      Mike from Seigfried’s motors said the current single circuit is
      at 50% strength.
    • Install front disk breaks. I’ve been looking at CSP’s that can run
      with standard 15″ rims
  • Wandering / stickyness in the steering. There is a need for over compensation when trying to stay straight. Now that the bum starter has been replaced we can drive and do a more through check, but Bruce from eyeball engineering mentioned that bus’ center pin a good place too start looking. Stuff to look at:
    • check the center pin for play and replace if needed.
    • Continue with John Muir’s idiot’s guide to VW’s steering check.
    • greasing of the front end (and other grease points as well)
    • new tires

We got to the car wash and after dumping $2.75 in quarters in the machine I blasted the engine and underside with soapy water. Thick chunks of greasy dirt clods came off. After the soap/water we moved to water rinse. Water pooled in the aux battery tray and I can see why the rust out so easily. Luckily mine are still structurally intact and with 95 degree weather they dried out really well.  We did forget to spray a lot of the underside with degreaser, which would have helped, but none the less I did a decent job getting the heavy stuff off.

A guy was standing close by sort of watching us as I was underneath the car in a pool of water and grease and must say I was a mess. It turns out he works at the apparently unmanned car wash. He wasn’t too pleased that we just deposited as much grease as he gets in a month and explained that they pay for a service to clean out the grease which pools in the drains. He was about my Dad’s age, but had a foul mouth and seemed rather politically opinionated especially (negative) towards Obama.

I jumped in to get out of there and fired it up to see that it didn’t want to turn over any more.  Looking at the engine it would turn over once and would then make a wurring sound, but no movement. We figured it was wet and waited about 10 minutes while talking with car wash guy, who apparently owned a vw bus at one time or another, but was now more into GMC’s. We tried once again and no go, so we pushed it over to the side and tried to push start it. It wouldn’t push start either.

My Dad was confused, the guy was saying this and that, and I wasn’t sure what to do.  It had been a half an hour and still not turning over, so in a panic I called Bruce and described what was happening. I mentioned the new starter and how I wired it up and he confirmed that it was done correctly and I mentioned the pressure wash and push start. He mentioned a few things, but settled on the distributor being wet (which would explain why the push start didn’t work) and the battery might be low (which would explain why the engine isn’t turning over).

I thanked Bruce for the help in my time of need and pulled off the distributor and it was indeed wet. After 5-10 minutes it dried and then the man gave us a jump with his car via the cables I had and the bus fired up!! Right on.

I jumped in and checked around, but noticed that my vision might be better if oriented the elephant ear mirrors on their side. I hoped but and grabbed the driver mirror and gave a medium strength twist like I had earlier playing with the passenger side, but this time the metal turned soft and gave out causing the mirror to flip out of my hand, shattering on the ground!

Putting the broken mirror behind me (mentally and I guess physically as it was in the cargo area) I pulled out into traffic keeping in the fast lane so that I wouldn’t need the driver’s side mirror too much since we needed to turn left from Shaw onto Marks to head back home. On Shaw and in the fast lane I got the bus up to 45mph and it felt strong, which lines up with what the mechanic at Sigfreid’s said about the engine’s compression.

At this point we had missed the 1:30pm Underground Garden’s tour and were about 25mins away from the 2:30pm tour, so we pulled in, cleaned up, grabbed the camera, and hopped in the car to arrive 2minutes before they closed the door for the tour.

When we got back I reached in the cargo area where the original owner’s crate was. He had a box with an old mirror in it. The backing on the mirror was bad, but it was the original mirror for the bus with paint on the mirror post. Using WD40 to lub up the passenger side mirror I and my Dad pulled it out and fit the original mirror in. Then we wrapped the newer (but still old) passenger side mirror into a vice wrapped in an old sock to keep the vice from marring the surface and removed the mirror from it’s post and installed this mirror on the driver side. Now the bus has two mirrors, so it’s once again street legal.

As a side note the broken mirror reviled that the mirrors are held in simply with some double sided adhesive, so it might be possible to replace the bad mirror in the original as well as find another original on thesamba to match.

After this we headed over to my Great Aunt’s for some swimming, dinner, drinks, and converstation. I had a great time with the family and the next days adventure for my brothers and Matt’s wife Jenny was planned. They settled on going to San Louis Obispo, but since I had to head back to Oakland it made since for me to stay, see Bruce and work on the bus. My cousin Mike was there also and we talked about borrowing his air compressor and shop lift in the future, so this will make media blasting and dropping the engine more of a possibility.  I’m looking forward to getting there.

7/12/09 – Cleaning and frontend inspection.

Woke up this morning, grabbed some coffee and started checking out the cab.  It was pretty filthy.  I cleaned out the surfaces beneath the passenger seat and rubber mat with a whisk broom.  The seats have been recovered and made more padded, which is deteriorating into a red power.  In areas that are sticky for some unknown reason the red dust mimics rust, but rubs off easily

The door panels are old and worn out.  It would be nice to replace them with some new pocketed door panels.  The package shelf had an old bandaid box, a guide to rebuilding a carborator, the spare key (not from a VW blank), and a lot of the original door panel screws.  All found items I placed in an old coffee can kept in my bus parts area.  I pulled a lot of old dirt from the cab.  The dash color is solid blue and the paint seems really original.

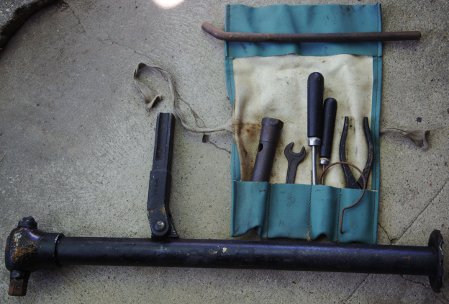
Pulled back the driver side seat and found some old oil change records from a service station in Sunnyvale (South Bay near Mountain View) on the bulkhead. It’s a bay area bus!  With both seats pulled out of the way, looking in the toolbox area I found the original jack and the original toolkit, which was an awesome find.  Had some breakfast and my mom borrowed my great aunts’ wet/dry shop vac for the day, so I could do some cleaning.

The original toolkit has the following:

  • jack / lug socket with multi-purpose bar / pry bar.
  • pliers / wire-cutter
  • two wooden handled flat head screwdrivers, one with a very wide blade possibly used for changing the fan belt.
  • wire hubcap puller
  • wrench with 8mm and 13mm sizes
The original toolkit.

The original toolkit.

Also on the driver side was a church key attached just inside the drivers door at knee height.  The rear engine latch and the engine fuel door use the church key and they’ve both been removed.  So I’m guessing they broke or were removed by someone who didn’t know the church key’s location. I’ve ordered replacements and plan on installing them the next time I’m in Fresno.

The floor of the cab looked really good.  There was a spot on the passenger side that had a rust bubble bigger than a quarter, but smaller than a half dollar.  I flaked it up to check the strength of the area and it looks good, just needs some blasting and protection.  I used the vac to get the inside free of loose dirt, but it still needs to be wet cleaned, which will come after the blasting.  I’ve ordered a speed blaster since I’ll mainly be doing spot work (even if some of the spots are rather large in the cargo area).

My Dad came out and he helped me clean out the cargo section, which had a wooden workspace setup inside.  Two metal u-shaped pices of metal clipped in to the lip around the roof and could be perfect to hold something surfboard shaped.  A foot and a half high piece of plywood ran the length of the cargo area and was held on the cab end by two screws through the center of the bulkhead   The back end of the plywood was held by a 3″ high piece that fits the width of the cargo area and boxes in an area over the engine compartment.  Two other pieces were loose and one looked as if it was held by the u-shaped metal pieces because it was covered by hooks.  The other wood piece could have formed a table or also hung from the metal pieces.

Once the cargo area had been cleared we looked at some rust.  My Dad pulled out paint scrapers and we went at loosening the scaled rust over the engine compartment.  That area has been bent down from overloading it with weight and the indented area has surface rust, but seems structurally sound.  A lot of the original grey paint is still there, but the owner sprayed a fake granite paint in the inside that I’d like to strip off.  In a few weeks I’ll see what some media blasting says about the condition of the metal below.  After the cargo area was clean we pushed the bus out side the garage to inspect the front end.

Last week on the 7th my Dad took the bus over to Siegfried’s in Fresno, who did an inspection and they pointed out what Reid and my Dad said about the front end.  There is some sporadic looseness in the front end that requires over compensation with the wheel.  I’ve not driven it, so I’ve not experienced it first hand, but it sounds like it could be bad.  I’d found a good description of the process of inspecting the front end on thesamba (I’ll update with the link).  And between the Muir book, Bently Manual, and the online info we tested the wheel bearings, tie rods, the stearing dampner, and stearing box.  All seemed good except for a minor amount of play in the steering box, but nothing that I could see that would explain the wobbling described.  This process involved removing the splash pan underneath the bus and also allowed us to get a view of how the emergency brake, shifter, and peddles are linked to the backend of the bus.

After the cargo area I turned my attention to a grey milk crate that the previous owner stored a bunch of junk in.  It had the following:

  • old tools (sears and roebuck ratchets with a flip flop mechanism)
  • the old generator from the bus (need to look if it’s 6v)
  • jumper cables
  • A extendible grabber (think arcade claw game).
  • 4 quarts of oil (not the weight that Glenn recommended the day before)
  • rubber stripping for lining the rear cargo door
  • The rear cargo door mechanism (just ordered one of these unfortunately)
  • A plastic jar of really rusty pieces of metal.
  • A T shaped rear catch handle that didn’t match the key
  • Another VW latch for the engine compartment labeled BOMORO
  • a cracked old generator belt
  • some more stuff like crescent wrenches and odds and ends.

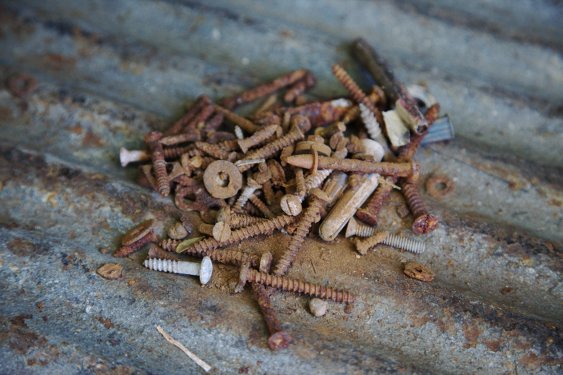
In that crate was the rear cargo door mechanism that we tried pairing with the door and in doing so heard some rattling from the rear cargo door.  With a finger I could feel something inside, so I used the grabber to reach in and pull it out.  Near where the rear cargo door has a slot for a rod was wedged a group of rusted screws and the sound of quite a few more came from inside the door.  In the end I pulled a pile of screwes, bolts, spacers, and even a wood colored crayon for woodwork.  The other door contained a home made paint scraper, so my Dad and I reasoned that the previous owner did a lot of paint work.

The cause of a rattling in the rear cargo door.

The cause of a rattling in the rear cargo door.

We paused for some lemonade and I checked out the cargo area dome light, which had been totally crushed and will need to be replaced.  I pulled it and taped up the wire to keep it from working it’s way out of the frame.  The interior light in the cab looks good, but needs a bulb and lens replacement.  I’m also missing the switch in the cab to control the lights, which I found is rather expensive online.  I’ll shop around a bit.

At this time it was getting late and my train back to Oakland was an hour and a half away.  My brother Will showed up and we talked for a bit before pushing the bus back in the garage and cleaned up.  A quick shower, dinner with the family, and a the train ride finished up the night.  I had a great time getting things started and visiting with family and look forward to the next visit.

References:

7/11/09 – Starter

The night before was my first time looking over the bus as I bought it by proxy of  my friend Reid May.  He owns an older karmann ghia and was heading down to Fresno from Oakland.  He did a great job describing it.  It’s an older car and has condition issues.

The year my car was made, a 6v electrical system was used.  About 10 years ago the bus was converted to 12v.  Some things were easy to convert and somethings a bit more difficult were left to be delt with, such as the starter.

The starter is a 6v system that runs on 12v.  The 6v starter can run on 12 volts, but should not be heavily used.  Mine in particular had a looseness to it that is caused over time by the hammering of the 6v solinoid running on 12volts.  This looseness allowed the starter to engage when it shouldn’t as well as fail to engage when it should.

The pain of trying to run a 12v starter in this bus is that 12v starters are built to work with a larger flywheel, which requires grinding out a lot of metal to install.  Wayne Johnson said he would ship out this hybrid starter in a week or so.

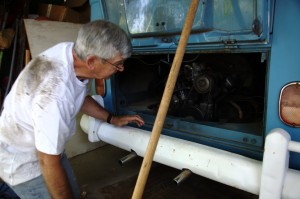
Dad proping open the engine compartmen.

Dad proping open the engine compartmen.

Took off the bumper for easier access and my dad loosened the starter’s bolt from back right wall of the engine compartment behind the fan cover and clamped vice grips on it.  From underneath I could get a ratchet on it and loosen it the rest of the way.

At this time Glenn showed up in his perfect 56 bug and took me over to Lester’s house, who has a  finished 59 delux and a panel for his son.  Lester mentioned an oil bath air filter he might part with for a reasonable price and that I should get the starter tested at Sebring West.  Glenn took me back and I along with my Dad finished pulling out the starter.  It’s hefty and tight in places to maneuver around the break cables and heater tubes.

original Bosch 6v starter

original Bosch 6v starter

My Dad turned over the engine as I took photographs of the flywheel teeth as well as feeling them.  The teeth were pretty square, but effected by the starter.  I’ve got those photos on my Dad’s computer, so I’ll update with them.

Off to Sebring West to get the starter tested.  It was toast, but they had both 6v and 12v starters that my Dad and I looked at that were noticeably different in size and teeth spacing.  We decided to do some more research before buying a replacement, so I tested the voltage with a volt meter when we got home and verified that it was indeed running off of 12v.  After a pasta dinner at my great aunt’s house I was looking online and came across Wayne’s ad.  He’s a nice guy and I hope the new replacement will work well.

Inital Post and M-Plate decoding.

I’ve created this blog to better track my progress in restoring my car.  Part of the value of something is the context and history surrounding it.  I’ve been taking paper notes of the two days I’ve spent working on it so far and will be transfering those and future notes here.

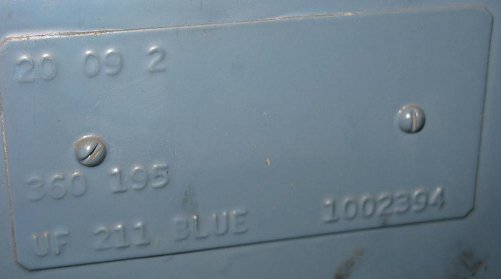
A few minutes ago I was decoding the M Plate that has basic info about the car.  The top line shows the day, month, and last digit of the year of production (in this case 09/20/1962).  The next line shows the buses two m-codes that can be decoded via this table.  The bottom line shows that the import location was UF, which is San Francisco.  The “211” indicates that it’s a Type 2 VW Panel Bus with cargo doors on the passenger side.  The word “Blue” refers to the Dove blue color of the bus and the last number 1002394 indicates that it was the 1,002,394th bus VW produced.

The M-Plate from my 1963 Volkswagen Panel Bus

The M-Plate from my 1963 Volkswagen Panel Bus

A big thanks to Matt Lancaster and The Samba for posting these lists.